|
Page Directory
Introduction
Specifications
Drawer Components
Dovetail the Drawer
Drawer Bottom
Assembly
Guide Bushings
Additional Tips
Stabilizer Table
Mill Through DTs
Print Friendly
Site Directory
Home
Tool Reviews
Projects & Plans
Articles
Our Shop
FAQs
Sites I Like to Visit
Build a Kayak
E-Mail Us!
|
|
Making a drawer using half-blind dovetails is a pretty simple matter, especially if you use a dedicated half-blind dovetail jig like the Porter Cable 4112, Porter Cable 5116/7116 omnijigs, Hart Dovetail Jig, or similar dedicated half-blind dovetail jigs. Jigs like the AKEDA and Leigh also produce half-blind dovetails, and though they require a little more setup, offer the advantage of variable-spaced, symmetrical or asymmetrical layouts. And if you're going to apply a false front on the drawer, don't discount using a through dovetail jig like the Keller--the visual results will be the same.
I am often asked whether or not I dovetail the back to the sides. The answer is yes. Traditional drawer making (whatever that is) prescribes a HBD joint for the front and TD joint for the rear, probably because hand cutting TDs is easier than hand cutting HBDs. I have used/use both half-blind dovetail (HBD) and through dovetail (TD) joints for the side/back joint. Here is my reasoning regarding drawer joints:
- When using a dedicated HBD jig, it is easy and quick to rout both backs and fronts and it produces a more uniform looking drawer, from the side. Plus, the slot for the drawer bottom is not exposed.
- If I am using the Leigh or AKEDA to rout the HBDs, I use the HBDs for the side/front and TDs for the side/back joint. The design of the AKEDA/Leigh jigs allows you to produce side/rear TDs and side/front HBDs that match in both layout and geometry.
- With that said, I have also used the dedicated HBD jigs to rout the side/front and the Keller TD jig to rout the side/rear, primarily because of the simplicity and speed of using the Keller. However, the result looks "traditional".
When designing a drawer you have to determine three values: Drawer Height/Depth, Drawer Width, and Drawer Length. Here's how I come up with these values:
Drawer Height/Depth
Typically I size the height of the drawer based on the finger spacing of my dovetail template with the goal to end up with a half-pin at the top and bottom edges of the drawer front. Consequently, when I design a piece of furniture or a cabinet, I design it around the height of the drawer, based on my dovetail jig's spacing. One of the advantages of the Leigh D4 and AKEDA DC-16 dovetail jigs is that you can adjust the pin/tail spacing to fit any drawer opening. However, I have not found the limitations of the fixed dovetail spacing of the dedicated half-blind dovetail jigs to be a problem. If the height of a drawer opening has to be a value that does not match the dovetail jig, I use the closest spacing and use an appropriatedly sized drawer front.
Traditionally, you want the edges of the drawer front to start and end with a half pin. To determine drawer widths to fit this rule, simply measure between the centers of the template fingers, beginning with the edge stop. For the PC 4112/PC 7116, use increments of 7/8", thus the approximate board widths are: 7/8, 1-3/4, 2-5/8, 3-1/2, 4-3/8, 5-1/4, 6-1/8, 7, 7-7/8, 8-3/4, 9-5/8, 10-1/2, 11-3/8. I say approximate widths because you can add 1/16" to 3/16" to these widths.
Drawer Width
Determining the width of the drawer box is a simple matter of measuring the inside dimension of the drawer opening and subtracting for drawer guide clearance (if they are to be used) or 1/8" if guides are not used. This final measurement determines the width of the drawer front and drawer back (assuming HBDs). Since the sides inset into the drawer front/back, the length of the drawer front/back determines the width of the drawer. A trick I learned from a Frank Klausz video simplifies making this measurement. Rather than measuring, simply mark your drawer front, previously cut to a rough length, at the drawer opening. I tend however to simply measure the opening and deduct for clearance.
Drawer Length
Determining drawer length is a simple matter of choice, somewhat based on the length of the drawer opening and your
drawer guides if used. I usually make the drawer 1/2" to 1" less than the opening will allow. This value is then used to determine the length of the drawer sides. I use the following formula when using 3/4" front/backs:
Side Length = Length of Drawer Opening - 1-1/2" (Where 1-1/2" is clearance plus drawer front/back thickness - 3/4" [nominal socket depth])
To be more precise, you can use this formula:
Side Length = Length of Drawer Opening - ((thickness of front - dovetail socket depth) + (thickness of back - dovetail socket depth))
Component Thicknesses/Material
I typically use 3/4" thick stock for the drawer front, either 1/2" or 3/4" for the drawer back, and 1/2" stock for the drawer sides. I use hardwood or hardwood veneer plywood/MDF for the drawer front. I use pine, spruce, poplar, baltic birch plywood, birch veneer MDF, or MDF for the drawer sides. I use hardwood (poplar), hardwood veneer plywood, hardwood veneer MDF, pine, spruce, or baltic birch for the drawer back.
Perform the following:
- Crosscut drawer components to final length.
- Rip drawer components to final width.
- Move fence towards blade 5/8" and lower blade to 1/2 thickness of drawer sides and dado drawer front/sides for drawer bottom.
- Move fence towards blade additional 1/8" or so (to match thickness of drawer bottom) and dado drawer front/sides to final width for drawer bottom.
- If you're using TDs for the side/rear: Raise blade above thickness of drawer back, and rip all drawer backs. This allows you to install the drawer bottom into the drawer sides and front from the back after the drawer is assembled.
I often use veneer core and MDF plywood for drawer components. For asthetics and wear, I apply real wood edging iron-on
tape to all edges of the drawer front, top/bottom edges of the drawer sides, and all edges minus the bottom edge of the drawer back. If the bottom edge of the drawer will contact and slide against a drawer guide/cabinet frame, I protect the edge with solid wood rather than the iron-on tape. If I am using edging, I modify the crosscut/rip process a little:
- Rip drawer components to final width - thickness of edging.
- Apply edging to top/bottoms of drawer front/sides. Trim edging.
- Apply edging to top of drawer backs. Trim edging.
- Crosscut drawer components to final length - thickness of edging (drawer fronts/backs).
- Apply edging to drawer front/back ends.
- Dado drawer front/sides for drawer bottom and final rip drawer backs as described above.
- Layout the drawer pieces, inside face up and mark them as shown in Figure 2.
- Place the drawer components in the jig inside up and out with the bottom edge of the piece against the edge stop. The drawer sides are placed in the front clamp, the front and back are placed under the top clamp.
- Before routing I make sure:
- The letters marked in the corners of the two work pieces correspond.
- The drawer side and front/back are even height-wise.
- The drawer bottom dado is facing up (drawer front) or facing out (drawer sides).
- The bottom edge of the drawer components are against their respective edge stop.
- Rout the drawer components. Begin by routing a slight cut across the side drawer component, right-to-left. Then cut the pins and sockets, left-to-right.
Figure 2. Drawer Component Layout
We're almost finished!
- Dry assemble the drawer.
- I measure for width of the drawer bottom by inserting one end of a thin and narrow piece of stock in the drawer bottom dado on the left side
and and mark the stock where it intersects with the dado on the right side.
- I set my rip fences to the marked width and rip the drawer bottoms.
- I then measure the drawer for length and crosscut the bottoms to that value. This leave the drawer bottom approximately
3/8" long, which is fine. I leave it sticking out the back by that amount.
Assemble the drawer:
- Place a small amount of white PVA or slow setting glue in the sockets.
- Insert the drawer sides into the drawer front.
- Insert the drawer back into the drawer sides.
- Slide the drawer bottom in from the back. Nail the drawer bottom to the bottom edge of the drawer back.
 Guide bushings (also known as collars or a guide bush) are extremely versatile and indispensible for many router operations. However, template guide bushings are a poor choice as a template pilot where extreme accuracy and consistency is required. Dovetail cutters fitted with guide bearings are more accurate and less troublesome than template bushing-guided bits. Consider buying precision template bushings for dovetail routing. Precision bushings are available from Leigh, Woodcraft (look for the AKEDA guide bush), Hartville Tool, and other sources. I have learned the hard way that guide bushings can be a source of tit problems when used with dovetail jigs, especially combination jigs like the Leigh and the AKEDA. Guide bushings (also known as collars or a guide bush) are extremely versatile and indispensible for many router operations. However, template guide bushings are a poor choice as a template pilot where extreme accuracy and consistency is required. Dovetail cutters fitted with guide bearings are more accurate and less troublesome than template bushing-guided bits. Consider buying precision template bushings for dovetail routing. Precision bushings are available from Leigh, Woodcraft (look for the AKEDA guide bush), Hartville Tool, and other sources. I have learned the hard way that guide bushings can be a source of tit problems when used with dovetail jigs, especially combination jigs like the Leigh and the AKEDA.
I have found two common problems with guide bushings:
- They are often poorly machined. Their diameter and out-of-center tolerances vary greatly. I have guide bushings that are .030" out-of-center!. The best bet is to purchase precision guide bushings from Leigh, AKEDA (through Woodcraft), or whomever. Leigh offers precision 7/16" and 5/8" OD bushings, AKEDA offers a precision 7/16" bushing. The 7/16" OD bushing is the most widely used bushing with AKEDA and Leigh dovetail jigs. The PC4112 and PC7116 use the 5/8" OD bushing for half-blind dovetails. Note that for through and half-blind dovetails, the guide diameter is not super critical on the Leigh, since fit is controlled by moving the pin template out/in (through dovetails) or by raising/lowering the bit (half-blind dovetails).
- Even if you have precise guide bushings, depending on your router, it may be difficult to center the router bit perfectly within the guide bushing. Perfeclty centering the router bit to a guide bushing is easier said than done. For instance, Porter-Cable routers mount their base to the router using flat head screws. As you tighten the screws, they center themselves in the base, drawing the base to "their center". Thus trying to center them is almost impossible. Some Bosch bases (1617 for instance) are mounted with pan-head screws, which do allow for some adjustment. However, you still may not be successful in perfectly centering the base, bushing, and bit (even with their centering cone).
To check for guide bush concentricity, simply lower the bit into the bushing and rotate the bit counter clockwise. Since a dovetail bit is angled, you can lower it into the guide bushing until it barely touches--just make sure to rotate it backwards. If you see a consistent gap between the tips of the cutter and ID of the bushing, you're setup is fine (See Animated Figure 3). If the cutter tips hit one side of the bushing and shows a gap in other areas (See Animated Figure 4), you've got a problem. Another way of checking bit/bushing centering is to make a test cut into a drawer front/back to create a socket as shown in Animated Figure 5. Check to see whether your routed sockets are centered between the template fingers. If the sockets are not centered, you know you've got a problem with your bushing setup. Chances are, your bushing was not machined concentric.
| Figure 3. Centered Bushing and Bit
| Figure 4. Non-Centered Bushing and Bit
|

|
|
| Figure 5. Testing By Routing Sockets
|
|
I use the following procedure to check/adjust guide bushings:
- Mount the guide bushing and a straight bit in the router. The straight bit diameter must be less than the OD of the guide bushing.
- Setup the DT jig guide fingers to cut tails (through DT jigs) or sockets (half-blind DT jigs).
- Clamp a test board under the tail guide fingers or half-blind template.
- Run the router through several guide fingers.
- Visibly inspect the cut to determine that the cut is centered within the tail finger/template space. If it is centered, you're done.
- Otherwise, loosen the guide bush, rotate it 1/4 turn, and tighten it again.
- Repeat these steps until you get a satisfactory cut. You might want to mark the face of the guide bushing and router base to simplify this procedure next time around.
- If you cannot get the bit to center with the guide bush, try another guide bush. If you still have problems, you can try centering the base of the router/guide bush to the bit, but again, this is easier said than done.
- If you cannot correct the off-center problem, you might lessen the problem if you rotate the bushing so that the greatest deviation faces away from the jig (towards the operator). Then, make sure you keep the router facing the same direction as you rout the dovetails.
- (PC4112/PC7116/Leigh) Use the Leigh 8mm shaft diameter bits for less chatter. The Leigh 1/2" 14° 8mm bit works with PC4112/PC7116 dovetail jigs.
- (PC4112) Place a piece of wood, the same thickness (or slightly less) the drawer front/side under the clamp bars when machining work pieces less than 10" wide. Otherwise, the clamp bars will bend when you tighten the unsupported end down.
- Make sure the template / guide fingers lie flat against the work piece(s). It is very easy on any dovetail jig to get in a hurry and not seat the template completely down on the work piece. Of course if the template is not seated, you will see a gap between the end of the tails and their mating sockets.
- (Half-Blind DTs) Solid wood, baltic birch plywood, MDF core plywood, and MDF machine very well for both drawer fronts and sides. Veneer core (VC) plywood works okay for drawer fronts/backs (sockets) but the plys disintegrate when milling them for sides (tails). If you must mill veneer core plywoods, you can minimize tearout by sticking some 1/4" plywood to the front clamp bar.
- (Half-Blind DTs) I apply veneer iron-on tape to all four edges of veneer core plywood used for drawer fronts and backs. The tape machines well and the result looks like solid wood to the untrained eye (the grain direction is the tip off).
- (PC4112) I dedicated an old, cheap, 1 HP router for the jig. Consequently, without any muss, fuss, or tests, I can machine drawer components. To simplify setting the router's depth of cut (which in turn determines the dovetail fit), make a simple depth gauge block:
- Mount a 1-1/4" or so Forstner bit in the drill press.
- Set the depth of cut to 9/16" (PC 4112), or a little less.
- Drill a 3/4" x 4" x 4" plywood block at this setting in the center of the block. Drill another hole, but centered
through one edge so that the hole is exposed.
- Check the depth gauge against your current router depth setting. If it is shy, adjust your drill press depth guage to drill the required amount.
- I use a slightly different version of a reference block for the PC7116. After adjusting my depth of cut and milling successful joints, I rabbeted on edge of some 3/4" stock (to clear the guide bushing), and then ran the router down the edge, leaving a "dovetailed" edge, that I can now use for adjusting router bit depth.
- Don't rotate the router as you're machining the joints. The router base and template guides are not always perfectly
centered with the router bit. Any slight imperfection here seems to multiply several times which results in poorly fitting joints.
- Use sharp bits to reduce tear-out and uneven bottoms.
- Your work pieces need to be square and flat. How many times have you heard or read about the force that some dovetail jig clamps can apply and how they can flatten a cupped/warped board. Sure they will, but what happens when you release the clamp? Later, when gluing things up you'll have problems.
- Use eye and ear protection. Unlike shaping operations which usually only take a few minutes, machining joints for cabinet drawers can take hours of continuous router use. Protect your eyes and ears!
- Wear a smock to facilitate casting off the tons of chips that are thrown back. Thankfully, this is not a problem with the AKEDA (has dust collection) and the Keller (throws the chips away from the operator).
- Copy the manual and keep it near the jig.
- The March/April 1993 Issue of Fine Woodworking ran a great article by John Lively about making Drawers using
the $100-type Half-Blind jig. The best article I have found on the subject. It pretty much covers the subject
soup to nuts.
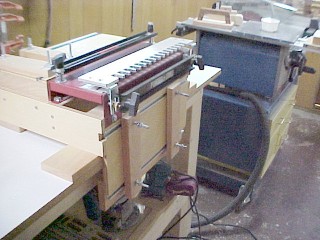
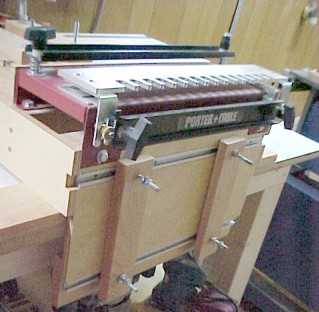
Wood Magazine has published a free project to build a Dovetail Jig
Stabilizer Guide. I have not built it but can express the need for such a table. R.L. Mott sent me
some photos of his stablizer table/guide. Note that RL added some T-Track to improve on the Wood Magazine design:
Machining through dovetails using the Leigh or Keller is a piece of cake. The procedure is as follows:
- Mill your drawer/box pieces square and flat. Size them to the finished dimensions, plus 1/32" or so on the length.
- Layout and your workpieces: Left Side Face, Right Side Face, Front Face, Back Face , similar to the method discussed for half-blind dovetails. Mark the bottom of each workpiece. With the Keller, you need to decide which edge (top or bottom) will be your common reference. Keller (and I agree) suggests that you use the bottom edge as your common reference. Thus, your dados for the bottom panel will align. The top edges may not line up perfectly, but this is easily remedied by planing the top edges once the box/drawer is assembled.
- Always begin with the tail boards and cut all of the tail boards before cutting your pin boards. The Keller won't require any pin adjustment (you adjusted this when you originally setup the Keller). All Leigh adjustment is done using the pin template.
Cutting the Tails
- Leigh: Clamp a tail board against the edge stop and the finger template. Adjust the desired dovetail layout using the pin template. Once you have the layout set and the fingers tightended down, flip to the tail template.

- Keller: Clamp a tail board in your vise and clamp the dovetail template to the work piece. I size my drawer/box to match the spacing of the dovetail template. To determine the exact drawer/box height, I use multiples of 1-1/8". Then I place the dovetail template over the tail board, so that the edges of the boards are equi-distant from their adjacent template fingers. When all is said and done, I end up with equally-sized half-pins. The Keller Instruction Guide recommends that you mark lines 5/16" to the left and right of the center line of workpiece edge. Then, align the template over the workpiece edge so that a template finger sits within your two lines. Finally, clamp a stop against the "bottom" edge of the work piece.
- Place your dovetail cutter in the router and adjust its depth to cut the thickness of the pin work piece, plus 1/64". I Scribe a line on the front side of the tail board by butting the "pin" board against the "tail" board, under the tail template and scribing the line using the pin board as the marking edge. Set the router on the template and lower the bit to intersect your scribed depth line. Unlike half-blind dovetail jigs, the depth of cut for through dovetails does not affect the dovetail fit. It only controls how far the tails/pins protrude.
- Cut all of your tail boards. On the Keller, you want to keep the bottom edge of all work pieces against your stop. Thus after cutting one end, you will flip the work piece (like a river boat paddle) rather than rotating it (like a propeller). Consequently, for one cut the face will be towards the backing board and will face way from the backing board for the second cut.
Cutting the Pins
- Place the straight cutter in the router and adjust its depth to cut the thickness of the tail work piece, plus 1/64" using the method described for the dovetail cutter above.
- Leigh: Place a test pin board in the jig. Rout the test piece and check for fit. Adjust the pin template as necessary. Once it is adjusted correctly, machine all pin boards.
- Keller Method 1:
- Clamp a pin board in your vise, outside face away from the jig.
- Place its mating tail board corner on the end of the pin board in its correct position, relative to the finished product (make sure top/bottom edges are aligned) and scribe the first tail socket onto the pin board. Keller suggests that you use a pocket knife. Make sure the blade rides on tail socket edge, not the socket wall.
- Place the pin template on the work piece. Line up a finger of the pin template between the scribed lines.
- Machine the pin board end.
- Repeat all steps for each pin board end.
- Keller Method 2:
- Clamp a pin board in your vise, outside face away from the jig.
- Place its mating tail board corner on the end of the pin board in its correct position, relative to the finished product (make sure top/bottom edges are aligned) and scribe the first tail socket onto the pin board. Keller suggests that you use a pocket knife. Make sure the blade rides on tail socket edge, not the socket wall.
- Place the pin template on the work piece. Line up a finger of the pin template between the scribed lines.
- Clamp an edge stop along the bottom edge of the work piece.
- Machine the one end of each pin board that shares the bottom edge/face away orientation.
- Remove the edge stop. Repeat the scribe and edge stop setup (stop will be on the opposite side) for the pin board ends you have not machined.
- Machine the remaining pin board ends.
Don't discount making through dovetail joints by hand or the hybrid method employing both the bandsaw and hand. If you're not doing a ton of through dovetail joints, doing them by hand makes sense. If you're a novice at making through dovetail joints by hand, buy or rent the Dovetail a Drawer video by Frank Klausz. Actually, this video teaches alot more than just dovetails. I found his general woodworking techniques to be very enlightening.
I came up with a chart comparing the Keller, Leigh, AKEDA, and PC Omnijig dovetail jigs. Click here to view it.
Here is a run down of Dovetail jigs you might consider:
- AKEDA DC-16 Through and Half-Blind Dovetail Jig
The AKEDA DC-16 from AKEDA Jigs Incorporated is the new guy on the block and certainly is a must-consider dovetail jig. Without any adjustments, the jig produced flawless, variably-spaced through dovetails for a box on my first try. I had the same experience with my first drawer. The jig comes through on its promises: no adjustments, excellent dust collection, virtually no setup, dovetail layout is easy and repeatable. It is quite simply a joy to use. Also, I like the geometry of the dovetails. They're more aesthetically pleasing than most machine-produced dovetails. Woodcraft handles the distribution of the AKEDA DC-16 for the U.S.
- Leigh D4 Through and Half-Blind Dovetail Jig
The Leigh dovetail jig Leigh Industries, Ltd. Is considered one of the best jigs on the market. I have had one for many years and like it for through dovetails. Leigh offers an extensive array of accessories that allow you to mill mortise and tenons, a variety of box joints, and decorative joints.
- Porter Cable 16" and 24" (5116 and 7116) Dovetail Jigs
The Porter Cable #5115 and #7116 jigs run $350 and $400, respectively. They are among the most robust jigs on the market.
Porter Cable offers a variety of optional templates to compete with the Leigh as being the most versatile dovetail jig available. Someday we'll get around to publishing a review on it.
- Porter Cable 12" 4112 Half-Blind Dovetail Jig
The Porter Cable #4112 dovetail jig runs about $100 and
is for my money, the best HB dovetail jig around. Click here to read my PC4112 review.
- Keller Through Dovetail Jig
The Keller is considered by some as the easiest-to-use through Dovetail jig. I agree! Models run $150-$450. I purchased my Keller 1601 from Seven Corners Hardware for $189.00, which is considerably less than the show price ($209) or the suggested retail price ($249). Check out the Keller web site! It provides
some great info and a gallery of work from Keller users!
- Woodrat Dovetail/Joinery Jig
The Woodrat is perhaps the most unique dovetail (joinery) jig on the market, and thus appears to have the largest learning curve. I have not used the jig, but it gets high points for versatility and creative/artistic capacity. Setups appear to be more complex than typical jigs. Runs in the neighborhood of $500.
- RBI Wood Tools
RBI sells a PC 4112 look-alike for $100.
- Hartville Tools Model 12378
The 12378 is another PC4112 look-alike for $100. Hartville sells aftermarket cam-action clamps for the 12378 that also fit the PC 4112.
- Woodhaven Dovetail Jigs
Woodhaven sells a variety of dovetail jigs including their new top-of-the-line jig that can be used in the conventional mode or on top of a router table.
- Sears Craftsman Dovetail Jigs
Don't laugh, my father uses one of the cheaper models with excellent results. I recently gave him my old Woodstock Intl jig so he might retire the Craftsman, but don't count on it.
- Woodstock Intl Half-Blind Dovetail Jig W1099
This jig, also sold by Harbor Freight (Central Machine) and others, runs between $40 and $60. It works pretty well.
- Katie Jig
A relatively new jig that has received good reviews. It runs $250 plus. Marc Sommerfeld demos the Katie at the Woodworking shows. Impressive in that you can clamp a tail and pin board in the jig at one time (given you're cutting them on a router table). This ensures the alignment of the top/bottom edges and could be a real time saver if you had a two router setup like Marc Sommerfeld has at the shows. One drawback I saw in the demo is that the tails/pins top/bottom orientation is swapped on each end, unless you had two setups. If you get a chance to attend the WW Shows, look at the side of Marc Sommerfeld's drawers and you'll see what I mean. Functionally sound, but......
- Stots Dovetail Template Master
You use this template master to make dovetail and box joint jig templates. You can use it to make templates of virtually any size. It runs about $50 plus another $30 for the router bits if you don't have them. I want to try this tool, but I just have not had the time to fool around with it. Review coming soon.
- Incra and Jointech Router Fence Incremental/Positional Jigs
I would not consider the Incra and Jointech jigs for production work, but they work well if you are up to the setup. They work as advertised, but are time consuming to setup and use compared with dedicated dovetail jigs. For what
it's worth, I prefer the Jointech positioner over the Incra. The Jointech is more roubust, uses leadscrew technology instead of the incremental racks, templates are easier to use, provides built-in centering, and their fence construction and design is excellent.
- The $19.99 Half-Blind Dovetail Jig
The Popular Woodworking September 1999 issue ran an article on a $19.99
half-blind dovetail jig. Click here to view the article in PDF Format.
The author (Troy Sexton) explains how to make a simple router template to machine the pins. The tails are cut
on the bandsaw. The price of "$19.99" includes $11 for a 23/32" diameter template guide and $8.95 for 1/2" 14 degree a dovetail
bit. You probably already have these items. The simplified process:
- Rip a 5/16" thick template the same width as your drawer pieces.
- Use a dado to cut notches on one end of the template. One notch per tail.
- Clamp the template to the back side of the drawer front.
- With your router sitting on top of the template, run the router in and out of the notches.
- Use the cut pins to layout the tails.
- Cut the tails on your bandsaw.
Was this article helpful? Do you have any questions? E-Mail Us! We would love to hear from you!
|