|
Page Directory
Introduction
What I Like
What I Don't Like
Bottom Line
Suggestions
Guide Bushings
Machining TDs
Alternatives
Printable
Site Directory
Home
Tool Reviews
Projects & Plans
Articles
Our Shop
FAQs
Sites I Like to Visit
Build a Kayak
E-Mail Us!
|
|
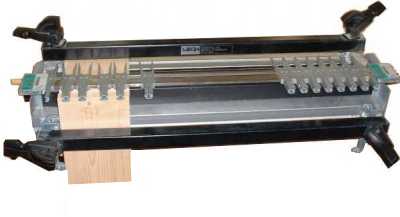
 I purchased my Leigh 1258-24 dovetail jig about 15 years ago and have upgraded it to function identical to a Leigh D4. The key feature of the Leigh 1258/D4 dovetail jig is its ability to layout/machine variable-spaced, equal-spaced, symmetrical, and asymmetrical through and half-blind dovetail joints. It also provides very fine control of joint fit. I use our Leigh primarily for through dovetail joints. I have used the Leigh for half-blind dovetails, but I generally use our dedicated half-blind jig (PC 7116 Omnijig) or the AKEDA DC-16 for machining drawers and other "boxes" requiring the half-blind dovetail joint.
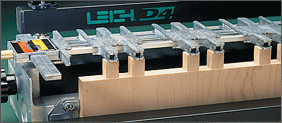
The Leigh dovetail jig has gone through some incremental changes over the years including adding the cam-action handles for the clamp bars, improved template holders, and perhaps the most important change, the new support edge guides. The original guide blocks, (used to align the sides of workpieces in the jig) were small and made of plastic. They were a problem to align perfectly and did not always provide satisfactory support. The new Leigh D4 edge guides are cast metal with adjustable edge pads. They provide a large support area and are much easier to adjust. Thanks to Leigh's modular design, you can retrofit older jigs with these new components as I have done. If you have the older jig and make the retrofits, make sure you purchase the new "D4" manual as well as the original manual will be obsolete.
I have received many emails that border on hate mail because I have not declared the Leigh dovetail jig as the best, the king, the jig without peers. I doubt few if any of my "detractors" have used their Leigh as much as I have used mine. I like the Leigh a lot. I have used it for many years. And yes, machining through dovetails is very easy with the jig. However, there are other jigs that compete with and, in some areas, beat the Leigh jig.
My advice in regards to choosing a dovetail jig is ask to yourself what features you require/want--then find the jig that best matches those requirements. I have compiled a comparison article that weighs the features of the AKEDA, Leigh, Keller, and PC 7116 Omnijig dovetail jigs. A few readers have responded that I have sleighted one or the other. Judge for yourself. You can produce excellent results using any of these jigs (AKEDA, PC 7116 Omnijig, Leigh, and the Keller). Which one is right for you? It depends on how often you plan on using the jig, what style of joints you plan to machine, what amount of setup time are you willing to spend for each project, what dovetail layout do you want to employ, etc. Luckily, I am in a position to choose the best jig for the project at hand.
| Cost:
| $400.00 (approx.), plus optional bits, templates, bushing guides, etc.
|
| Manufacturer:
| Leigh Industries Ltd.
P.O. Box 357
104-1585 Broadway St.,
Port Coquitlam, BC
Canada V3C 4K6
Tel: 604.464.2700
Tel: 1.800.663.8932
Fax: 604.464.7404
Leigh Email
|
Easy to Install and Setup
Installation and setup was easy--the toughest part is aligning the upper and lower guide/stop blocks. This is much easier
on the later model Leigh D4 jig, which as the new edge guide/stop blocks. In Dec 2002 I took our D1258 apart and reassembled it from scratch. Total time to reassemble it (using the D4 components) and setup the edge guides took about 1-1/2 hours, including making several test cuts.
Infinite and Variable Spacing (Layout)
Infinite spacing. You can arrange the through dovetail and half-blind joints anyway you want. This is probably the most important aspect of the jig.
- You don't have to design the widths of your drawer or box around the spacing of the dovetail template.
- You can create a drawer or box that appears to have "hand-cut" dovetails, with variable spacing rather than the perfectly equal "cookie-cutter" spacing other jigs produce.
- You can space the joints so that cutting off a lid from the main part of a box leaves full joints in view.
Variable spacing is great, but I suggest that you space your dovetails symmetrically for most projects. Asymmetrical layouts require that you make left/right (two) setups!
Through Dovetails Are A Piece of Cake
The Leigh makes machining through dovetail joints a very easy task. Anyone that can follow basic instructions can machine through dovetail joints in no time. Though test cuts are usually required for each new project, setup time is minimal. The only difficulty I have had is with guide bushing setup. More on this later.
Machine 1/4" Box Joints
The standard template can be used for machining 1/4" box joints. The setup is easy, requiring a 1/4" straight cutter and the standard 7/16" guide bushing. Spacing, in part, is handled by 3, 1/4" blocks you must manufacture--the more accurate the better. Leigh provides a PDF document that explains the whole operation in perfect detail at the following link:
Leigh Support and Manuals. For more control of joint widths, you can purchase an accessory (F1) finger joint template for the Leigh dovetail jig for about $315.00. You can read about it at: Leigh Finger Joint Template. Note however, this additional accessory is not required to machine 1/4" box joints with the Leigh 1258/D4 dovetail jigs.
One Template Does It All
One template (set of guide fingers) is used for half-blind, through dovetail, 1/4" finger joints, angled joints, etc. Thus, you don't have a bunch of templates lying around. This is one reason why I have not invested in the extra templates available for the PC Omnijig.
Hairline Cursors on Template Ends
The template ends include an index window and hairlines that make it easier to register settings, return to settings, and make fine adjustments. Since I retrofitted by old jig with the D4 components, I found it helpful to paint the area around the support bar index arrow black, and sand/polish the arrow to standout. In retrospect, I should have done it the other way, but any contrast is better than none at all!
Handles a Wide Range of Work Piece Widths and Thicknesses
One jig with the standard template accepts a wide range of wood thicknesses and widths. However, you will need a variety of dovetail and straight bits to match the versatility of the jig. I use the #80 dovetail bit and #140 straight bit for most through dovetail operations.
Additional Templates and Accessories
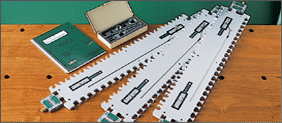
Leigh offers additional sets of templates for a variety of joints including box, mortise and tenon, and some decorative joints. Leigh also offers a variety of accessories, guide bushings, etc. I don't like templates and things lying around, so I have not considered purchasing these additional templates.


Great Manual and Support
Legendary manual and good customer support. However, I do prefer the original manual to their latest manual. The new manual is almost too much! By the way, get the video!
Inexpensive Router Bits
Actually, I go back and forth on this one, but for cost reasons, I like the fact that the Leigh does not require special router bits with bearings (like our Keller, and ...). I have learned the hard way that you should purchase the precision template guide bushings from Leigh. Standard guide bushings are often machined off-center which can cause problems routing dovetails. Frankly, bearing guided bits are probably a better way to go, but they're much more expensive.
With that said, the Leigh does require a variety of bits, and because of the Leigh template thickness, long shank router bits are required. These bits are often sold as "Leigh" bits. Leigh also offers bits with a shank diameter of 8MM. This larger (larger than 1/4") diameter shank reduces vibration. The ID of the most commonly used guide bushing prevents the use of 1/2" diameter shank bits.
D4 Features are Retrofittable
The Leigh D4 features are retrofittable to older Leigh jigs! I have the older jig, yet I was able to retrofit it to the level of the "D4". Of course the retrofit doesn't come cheap. Plan on spending a bit over $100.00 for the new style clamp handles, template ends, and edge guides. And if you want the D4 manual and video, you'll spend another $30.00 plus dollars.
Tear-out
The Leigh is infamous for its tear-out problems on the front and back of work pieces. You setup a conventional half-blind dovetail jig to machine a side and a front/back simultaneously. This provides a built-in "backer" board which greatly reduces tearout.
The Leigh instructions and dozens of users have suggested ways to eliminate tear-out. Most suggestions don't work. Suggestions that don't work include applying packing tape and pre-cuttting the wood fibers with a marking knife.
Methods that help include making a left to right incise cut (this reduces front tear-out), using a backer and fronter board, proper technique, and sharp cutters. Woods like pine and oak tear-out more than walnut, poplar, and maple. Forget plywoods other than Baltic-birch and Apple-Ply for through dovetails.
I have many hours on the jig and I still get tear-out. For awhile I was so upset with the tear-out, I began machining through dovetail joints on the bandsaw. I also do them by hand for simplier projects (thanks to Frank Klausz.) But you can't beat a dovetail jig for speed.
It's One Work Piece at a Time
You machine one work piece at a time. Okay, this is typical for through dovetail jigs, but this is one reason why I use the Porter Cable Omnijig for half-blind dovetails, I can cut one front/back with one side simultaneously.
Half-Blind Dovetail Setup
Half-blind dovetails are a bit of a pain. First of all, unlike conventional jigs you only cut one work piece at a time. Second, you have to cut 1/4" thick spacers used as bridges/fillers between the template fingers. Third, make sure you have
the right-sized bits. The dovetail bit delivered with my Leigh did not work with 3/4" drawer fronts.
Infinite Spacing is Great, but...
If you don't lay out the fingers to be symmetrical, you have to make two setups and the two setups must be exact mirrors of each other (for boxes and such where you're cutting off a lid which would highlight non-aligned tails/pins). I do vary the spacing, but I make sure it's symmetrical. The demonstrator at the show cheats with this a bit. He will demo some weird asymetrical layout, but only for one corner (two work pieces). He would have to make two setups (left and right) if he were to make a four-sided drawer or box. Shame, Shame, Shame! The D4 video does explain a simple method for setting up the mirror side of an asymmetrical layout.
You'll Need the Manual
Unless you use the Leigh frequently and you are like most folks, you'll probably have to read through the appropriate sections of the manual each time you use the jig. Plus, I have found that I cannot rely on the markings you place in the book for cutter/template setups--whether its caused by a difference in wood, routers, humidity, time of day, alignment of the planets and stars, I have not had any luck returning the jig to the "marked" settings. Thus, I always do test cuts for each project. This is not the case for our PC Omnijig, Keller, or AKEDA jigs. In my informal surveying of woodworkers that own the Leigh jig, few use it more than a couple of times a year. If that is the case, you better not lose the manual.
Guide Bushings
I have to arrived at the opinion that Guide Bushings are the root of all evil in regards to dovetail jigs that require them. I am not alone in this opinion (Pat Warner, router guru, agrees). More on this later.
The Leigh is an excellent dovetail jig. An excellent woodworking investment. I like the Leigh dovetail jig for machining through dovetail joints. I don't like it for machining half-blind joints. In fairness, many Leigh users have no problem machining either type of joint with the jig. For my money, it was worth it to purchase a dedicated half-blind dovetail jig like the PC4112 and the PC 7116 Omnijig.
For through dovetail joints, the Leigh offers advantages over the Keller and other similar jigs--primarily because of its infinite variable spacing capability. The trade-off is the Leigh is slightly more difficult to setup and use, and it is restricted in width capacity (24" maximum). And this is where the Keller shines as it could not be easier to use, does not require test cuts, and has no practical width limits.
So what is the bottom line? In the past I always said that if you wanted the absolutely most versatile dovetail jig, purchase the Leigh. If you want the easiest jig to setup and use, purchase a dedicated half-blind dovetail jig and the Keller through dovetail jig. But with the arrival of the AKEDA DC 16 dovetail jig, things are a bit more muddled. I have used the AKEDA DC 16 dovetail jig extensively. Like the Leigh, it produces through and half-blind dovetails, variable-spaced, symmetrical, or asymmetrical. However, its design makes dovetail layouts simpler than the Leigh, and has added features such as dust collection, one handed clamping, and so forth. I came up with a comparison chart of features and a weighted rating scale that might help decide between all of these excellent jigs.
|
