|
|
|
|
|
Page Directory IntroductionAssembly What I Like What I Don't Like Jigs Compared Bottom Line Machining TDs A Keller Leigh Suggestions Avoiding Tearout Alternatives Print Friendly Site Directory HomeTool Reviews Projects & Plans Articles Our Shop FAQs Sites I Like to Visit Build a Kayak E-Mail Us! |
Introduction
Ease of Use Reduced Setup Time What About Drawers Dovetail Jig Comparison Note: Clicking the hypertext links (bold-faced blue text) and blue-framed images will launch additional content.
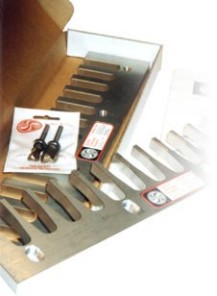
Keller 1601 Assembly and SetupThe Keller Jig consists of two 1/2" thick aluminum templates that you must mount to backer boards. The jig comes with the necessary screws and washers. I followed this process:
Adding a Clamp Bar to the KellerAdding a clamp bar to the Keller is simple to do and greatly faciliates using the jig. Such a clamp bar is even more useful on the Model 1500 Keller. The Model 1600 balances nicely on the end of the board, allowing you to apply the clamps with both hands. However, because of the Model 1500 two-sided design, it does not balance well (if at all) on the end of a work piece. Consequently, you have to hold it in place as you apply the first clamp. Here is what I did to add a clamp bar to the Keller backer board:
By the way, Keller sells a fast clamp set for the Keller jigs--it runs the better part of $100. However, even if you don't want to spend the $100, you may want to check out his fast clamp method--it is more elegant than mine. My method works well and costs almost nothing to implement. Note: I have since purchased and installed the Keller Speed Clamp set. The clamps are impressively strong and the setup works okay. However, and perhaps it is must my implementation, I find the clamps to be a bit of a pain to use. If I get to the bottom of the problem, I will include more information. If not, I will include more information! |
| Keller Review Page 2 |

|
 Welcome to our review of the Keller 1601 through dovetail jig. I purchased the Keller 1601 due to its ability to produce through dovetails with no setup/test cuts, it handles work pieces of unlimited width, and it does not use guide bushings (its cutters include guide bearings) to guide the cutters through its templates. After using the Keller for dozens of projects over the past five years, I highly recommend it for virtually any woodworker, hobbyist or professional. The Keller & Co marketing information and the many magazine articles that have reviewed it are right on--once you go through the initial assembly and setup, you can pump out through dovetail joints with no setup or test cuts. Let me touch on a few of these attributes:
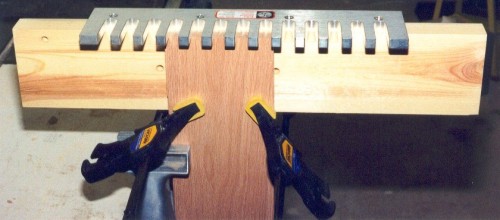 I started with some pretty lousy lumber for the backer boards (cupped and twisted). Consequently, I had to plane and joint the two pieces of stock for the backer boards. I sized mine 1-1/2" x 4-3/4" x 24". The boards must be flat and the front face must be square to the top, long edge. I used spruce, but any stable hardwood, softwood, or plywood should do as long as it's flat.