|
Page Directory
Introduction
What I Like
What I Don't Like
The Bottom Line
Assembly
Setup
Making a Drawer
Tips
Guide Bushings
Stabilizer Table
Site Directory
Home
Tool Reviews
Projects & Plans
Articles
Our Shop
FAQs
Sites I Like to Visit
Build a Kayak
E-Mail Us!
Printer Friendly
Version of
this article
|
|
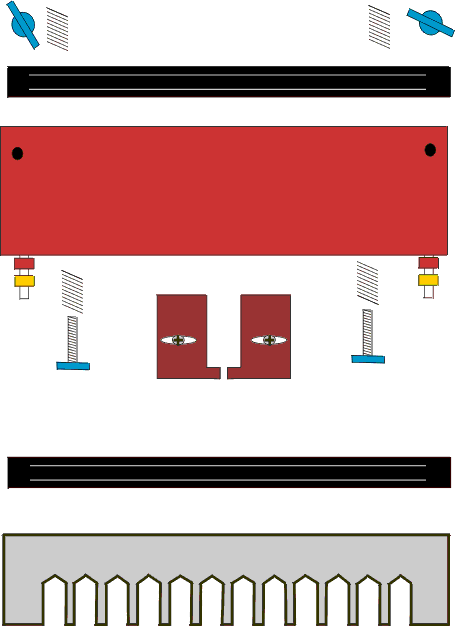
Assembling and setting up the jig should take less than 1 hour. The jig unassembled as shown in
Figure 1. However, it goes together without any fuss. A few tips:
- Follow the instructions in the manual, they're excellent.
- Do not tighten down the lock nuts on the template studs. You will later adjust the depth of cut and use these nuts as the
"stop".
- Fasten the jig down to your workbench. I use two #10 sheet metal screws to screw the front edge of the jig to my bench. I don't bother tightening the back down.
| Figure 1. PC 4112 Components
|
Follow these steps to setup the jig:
- Choose one of the four sets of edge guides. I use the #1 right/left guides all the time. However,
rabbetted half-blind dovetails will require one of the other sets of guides.
- Place two scrap work pieces (at least 4" to 5" wide) in the front clamp, one on the left side and the other on the right side.
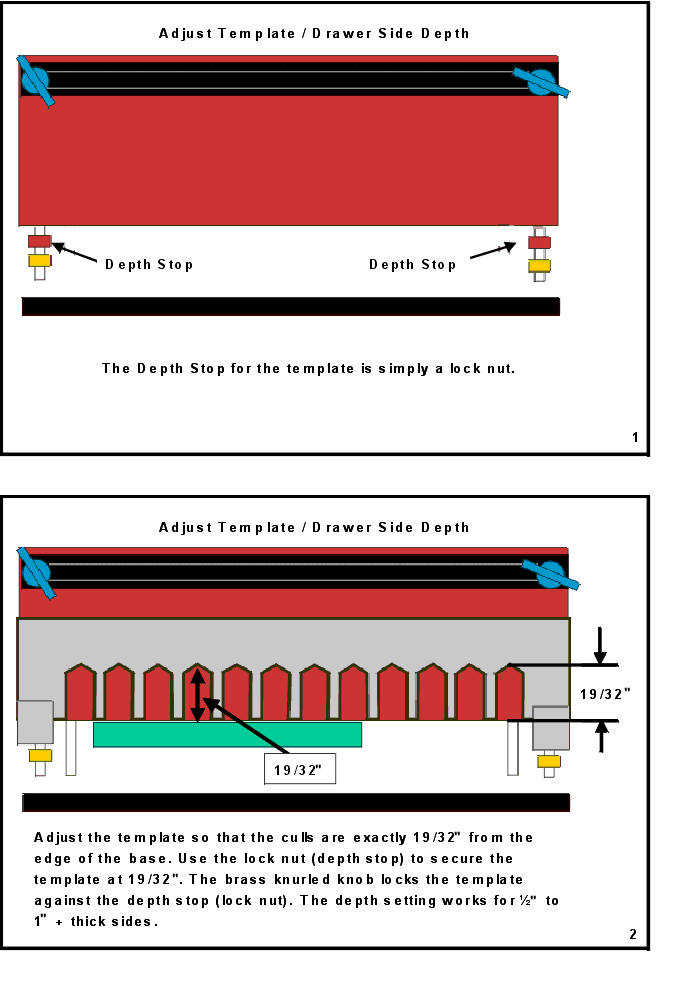
- Set the drawer side to drawer front inset (See Animated Figure 2):
- Place the template over the work pieces.
- Move the template so the cull of each template finger is between 19/32" and 20/32" from the front base of the jig (or the inside of the side work piece).
- Tighten the lock nuts against the template's slotted bracket. This sets the depth of cut or in other words, the depth that the sides will inset into the fronts/backs.
- When you make your test cuts, if the sides stick out from the front/back, increase the 19/32" value. If the sides inset too much, decrease this value.
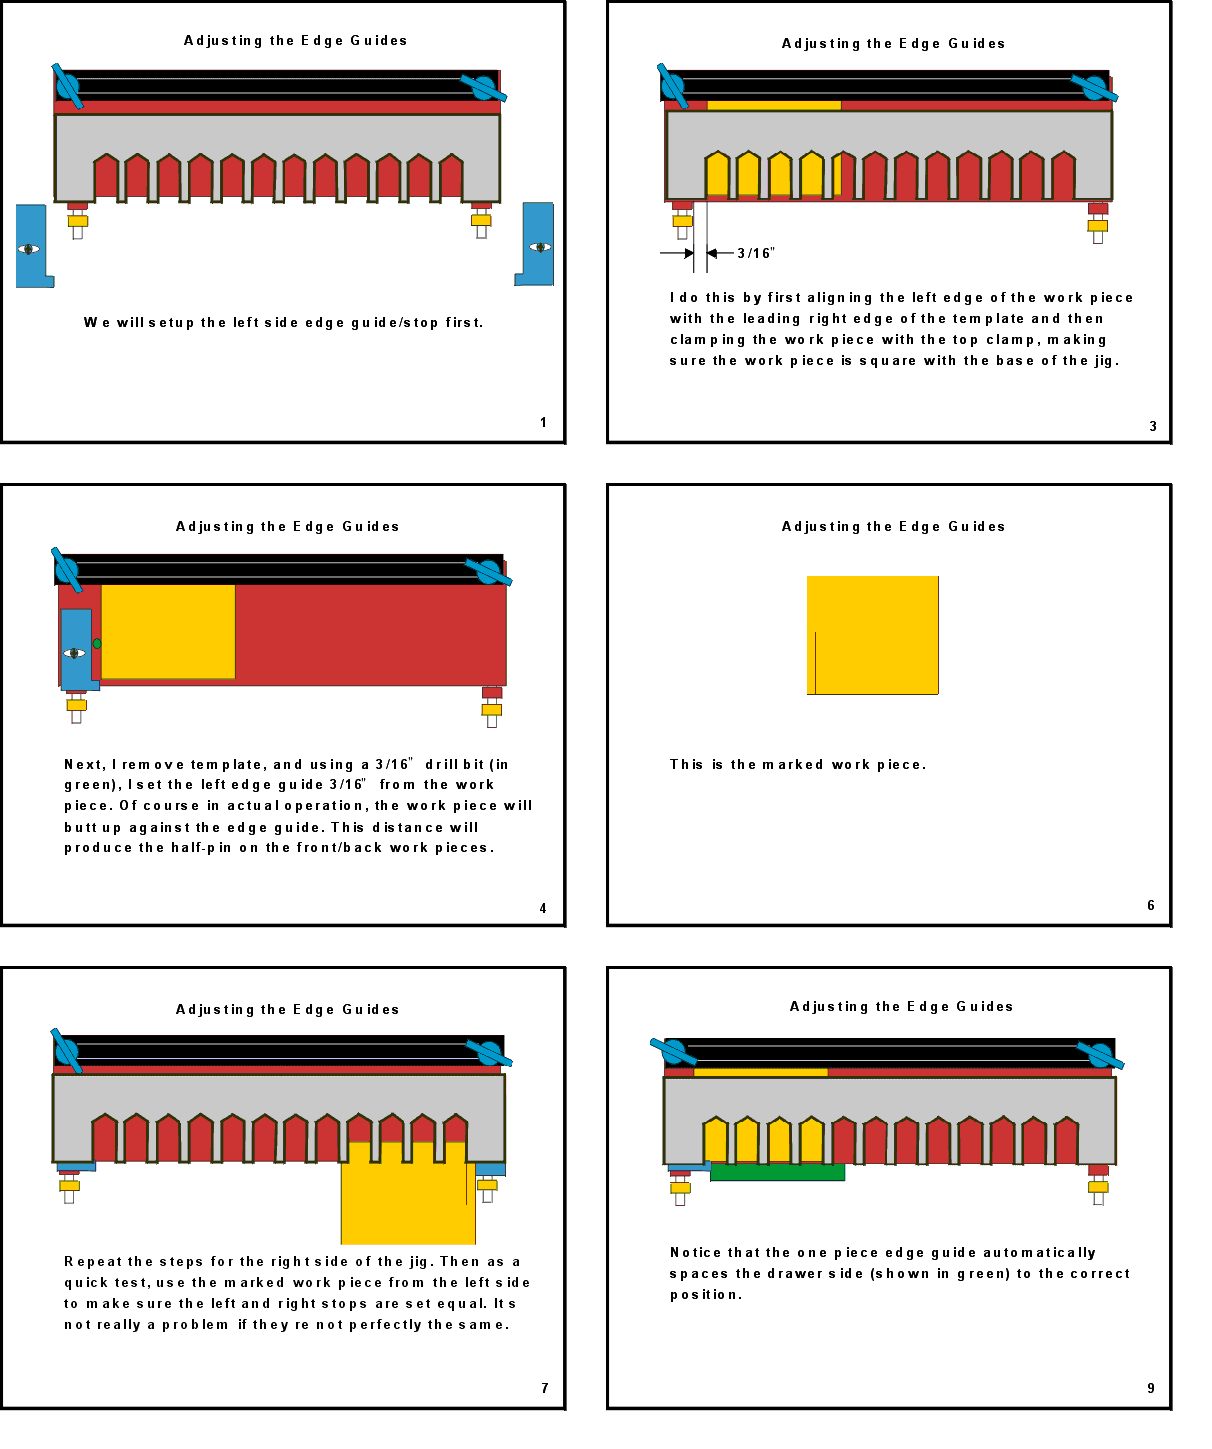
- Set the edge stops (See Animated Figure 3) for correct size half-pin:
- Place a work piece (at least 4" to 5" wide) under the top clamp on the left side.
- Place the template onto the work piece and tighten it down.
- Line up the left edge of the work piece with the the inside of the leading left side (but right edge) of the template.
- Clamp the top work piece with the clamp bar making sure it is square with either the front or back of the base.
- Remove the template.
- Place a 3/16" bar (or a feeler gauge set to 3/16") between the left edge stop and the work piece and tighten the edge stop.
- Replace the template and scribe a reference line of the right edge of the template onto the work piece.
- Repeat Steps 1 through 6, for the right side of the jig.
- Compare the right side with the left side by placing your scribed work piece under the template on the right side. The scribed reference line should line up perfectly with the right side, left edge of the template.
- Place a 5/8" O.D. bushing in your router with a 1/2" (14 degree) dovetail bit in your router.
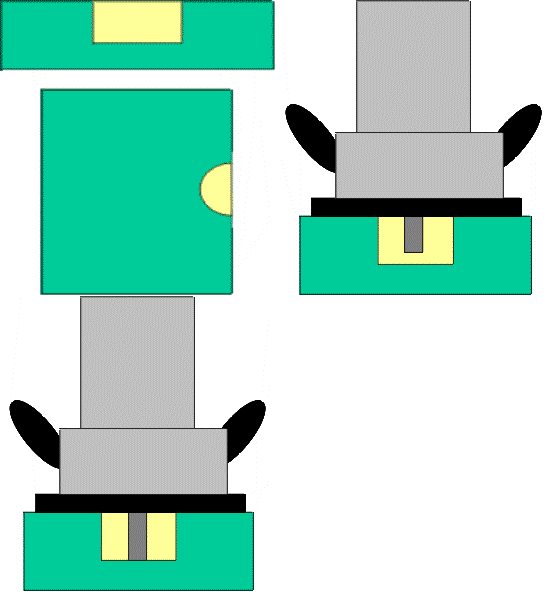
- Set the bit to cut 9/16" deep. The depth of cut defines the tightness of the joint. The deeper the cut, the tighter the joint. The shallower the cut, the looser the joint. Make sure you measure this from the router base, not the guide bushing base. I made a simple depth gauge block to facilitate setting this depth in the future:
- Mount a 1-1/4" or so Forstner bit in the drill press.
- Set the depth of cut to 9/16", or a little less.
- Drill a 3/4" x 4" x 4" plywood block at this setting in the center of the block. Drill another hole, but centered
through one edge so that the hole is exposed.
- Check the depth gauge against your current router depth setting. If it is shy, adjust your drill press depth guage to drill the required amount.
- That's all there is to setting up the jig. These settings will work for a 3/4" front/back and any thickness of sides (1/2" - 1").
|
Animated Figure 2. Dovetail Socket Depth Setup
|
Animated Figure 3. Edge Guide Setup
| |
Click Here to access a PDF File Containing Frames of Figures 2 and 3.
|
- Rip and crosscut your drawer pieces to their finished dimensions. The length of the front/back pieces determines
the width of the drawer/box. The overall length of the drawer/box is determined using the formula: length of side + (thickness of front - depth of socket) + (thickness of back - depth of socket).
- Dado the bottom of the front and sides to accept the bottom. I use a 1/8" kerf rip blade.
- Set the blade to cut half the depth of the thickness of the drawer sides and 3/8" from the bottom edge.
- Dado all sides and fronts.
- Move the fence another 1/8" or so to produce the final width to fit the thickness of the bottom material.
- Raise the blade to cut through the backs, and rip all backs at that setting. This allows you to slide the drawer bottoms into the drawer sides from the back of the drawer.
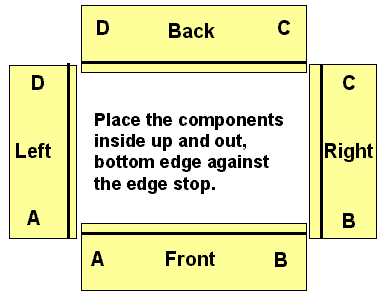
- Layout the drawer pieces, inside face up and mark them as shown in Figure 2.
- Place the drawer components in the jig inside up and out with the bottom edge of the piece against the edge stop. The drawer sides are placed in the front clamp, the front and back are placed under the top clamp.
- Before routing I make sure:
- The letters marked in the corners of the two work pieces correspond.
- The drawer side and front/back are even height-wise.
- The drawer bottom dado is facing up (drawer front) or facing out (drawer sides).
- The bottom edge of the drawer components are against their respective edge stop.
- Rout the drawer components. Begin by routing a slight cut across the side drawer component, right-to-left. Then cut the pins and sockets, left-to-right.
- I have been asked why I dovetail the back onto the sides (rather than use butt, dado, lock, or through dovetail joints). Simple, it's faster than any other method I know of that produces a quality joint and a square drawer. For instance, dadoing the sides requires time to setup the dado blade, mill the dado, and then crosscut the back to fit. Lock joints require even more setup and fooling around. Since the dovetail jig is setup, it only takes a a couple or minutes to rout the sides/back and you can crosscut the back equal to the front, saving time and ensuring a square drawer. In the past I used a through dovetail for the sides/back joint, but again, it is much easier to cut all front/backs to one dimension and use the single dovetail jig setup.
- Assemble the drawer by placing a small amount of glue in the sockets, insert the drawer side pieces into the drawer front, insert the drawer back into the drawer sides, and slide the drawer bottom in from the back. I nail the drawer bottom to the bottom edge of the drawer back. Assuming the jig is setup, I can rout and assemble a drawer in less than 10 minutes.
- I have been asked why I dovetail the back onto the sides (rather than use butt, dado, lock, or through dovetail joints). Simple, it's faster than any other method I know of that produces a quality joint and a square drawer. For instance, dadoing the sides requires time to setup the dado blade, mill the dado, and then crosscut the back to fit. Lock joints require even more setup and fooling around. Since the dovetail jig is setup, it only takes a a couple or minutes to rout the sides/back and you can crosscut the back equal to the front, saving time and ensuring a square drawer. In the past I used a through dovetail for the sides/back joint, but again, it is much easier to cut all front/backs to one dimension and use the single dovetail jig setup.
|
Figure 4. Drawer Component Layout
|
- Experiment with different cutters. Click Here to learn more about cutter options!
- Use the Leigh 1/2" 14° 8mm diameter shaft router bits for less chatter.
- Place a piece of wood, the same thickness (or slightly less) the drawer front/side under the clamp bars when machining
work pieces less than 10" wide. Otherwise, the clamp bars will bend when you tighten the unsupported end down.
- Make sure the template lies flat against the work pieces. It is very easy on any dovetail jig to get in a hurry and
not seat the template completely down on the work piece. Of course if the template is not seated, you will see a gap between
the end of the tails and their mating sockets.
- Traditionally, you want the edges of the drawer front to start and end with a half pin. To determine drawer widths to fit this rule, simply measure between the centers of the template fingers, beginning with the edge stop. For the PC4112, design the height of your sides in 7/8" increments: 7/8, 1-3/4, 2-5/8, 3-1/2, 4-3/8, 5-1/4, 6-1/8, 7, 7-7/8, 8-3/4, 9-5/8, 10-1/2, 11-3/8. These are approximate widths--you can add 1/16" to 3/16" to these widths.
- Solid wood, baltic birch plywood, MDF core plywood, and MDF machine very well for both drawer fronts and sides.
Veneer core (VC) plywood works okay for drawer fronts/backs (sockets) but the plies disintegrate when milling them for sides (tails). If you must mill veneer core plywoods, you can minimize tearout by sticking some 1/4" plywood to the front clamp bar.
- Make sure that your dovetail cutter is centered within the template guide bushing and make sure the guide bushing is concentric. If your bit is not centered in the guide bushing or if the guide bushing is not concentric, you'll end up with inconsistent joints, your drawer component top and bottom edges won't line up, and so forth. It is not unusual for a cheap template guide bushings to be out of round by as much as 1/32" or more. This may not sound like much, but it can drive you nuts when trying to machine a drawer or box so that all corners end up even!
Frankly, template guide bushings are a poor choice as a template pilot where extreme accuracy and consistency is required. Dovetail cutters fitted with guide bearings are more accurate and less troublesome than template bushing-guided bits. Consider buying precision template bushings for dovetail routing. Precision bushings are available from Leigh, Hartville Tool, and other sources. You'll need a 5/8" OD bushing for the PC4112/PC7116.
- I apply veneer iron-on tape to all four edges of veneer core plywood used for drawer fronts and backs. The tape
machines well and the result looks like solid wood to the untrained eye (the grain direction is the tip off).
- Make sure your work pieces are square and flat. I do not recommend that you attempt to use the clamp bars to flatten work pieces. Even though jigs like the PC 5116, PC 7116, or Akeda that have clamp bars that will flatten cupped work pieces it is not wise to do so as later you'll have problems when assembling the box.
- Consider purchasing the Hartville Tool Cam Lever Upgrade kit for Half-Blind dovetail jigs (#10599). It works with the Hart jig and the PC 4112.
- The design of the jig requires that you machine the drawer fronts and sides individually when making rabbetted drawer fronts.
- The 1/2" dovetail settings work with sides 1/2" thick and up and drawer fronts/backs, 1/2" thick and up.
- Remember, inside out on all cuts. In other words, you cut the drawer fronts/backs/sides with inside up/up/out!
- Consider dedicating an old or inexpensive 1 HP router for the jig.
- Don't rotate the router as you're machining the joints. The router base and template guides are not always perfectly
centered with the router bit. Any slight imperfection here seems to multiply several times which results in poorly fitting joints.
- Use sharp bits to reduce tear-out and uneven bottoms.
- Use eye and ear protection. Unlike shaping operations which usually only take a few minutes, machining joints for cabinet drawers can take hours of continuous router use. Protect your eyes and ears!
- Wear a smock to facilitate casting off the tons of chips that are thrown back. Consider purchasing the Leigh RVA (Router Vacuum Attachment). One of the best features of the AKEDA dovetail jig is its ability to collect 90% of the debris.
- Copy the manual and keep it near the jig.
- The March/April 1993 Issue of Fine Woodworking ran a great article by John Lively about making Drawers using
the $100-type Half-Blind jig. The best article I have found on the subject. It pretty much covers the subject
soup to nuts.
|

