Welcome to our review of the JointAbility Matched Edge Jointer. The JointAbility Matched Edge Jointer is used to
plane/joint edges using a router. Unless you have a well-tuned jointer, jointing long workpieces and plywood can
produce less than acceptable results. My projects often require jointing both long work pieces and plywood so I tried to devise an easy method to rout the edges. After several unsuccessful tries, and a dozen calls to Bill Gudeman (Jointability designer and original manufacturer), I bit the bullet and ordered the JointAbility Matched Edge Jointer.
I, like many wood show attendees, have seen the JointAbility Matched Edge Jointer demonstrations many times. I was never really interested because I generally get good results from my jointer/table saw and I thought the price was a bit high for what appeared to be a clamp and a piece of 3/4" melamine. However, lately, I have had difficulty planing and edge jointing long workpieces and plywood. Plus, to rationalize purchasing the JointAbility, I decided I could use it for both jointer and panel saw operations as well as other router operations, such as routing dados, rabbets, and so forth.
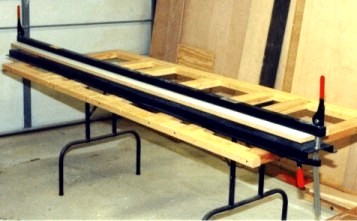
The JointAbility consists of a heavy steel frame, a melamine base attached to the steel clamp
bar, and a clamp set consisting of two cam action clamps, bolts and springs. A neoprene Strip is attached
to the top of the metal frame (between the frame and the melamine base) to prevent workpieces from
slipping. This standard feature was an $18.00 option in the past. My JointAbility came with
the basic fixture and a high quality 3/4 carbide-tipped, spiral straight cutter. I also purchased
the optional Saw Guide.
Installation of the JointAbility includes the following steps:
Install the clamp bar/board and its bolts, clamps, springs, etc. to the base. This
takes about 10 minutes.
Mount the JointAbility router bit in the router you plan to use with the
JointAbility and determine the distance between the outside edge of the router base
and the cutting edge of the router bit. Add approximately 1/8" to this measurement. We'll
call this, measurement "A".
Using a jig saw or circular saw, cut the melamine base on both sides of the clamp bar to the
width of measurement "A". Using a circular saw with the Saw Guide greatly facilitates this operation.
Using your router and the JointAbility router bit, trim the melamine base on both sides. This provides a
"0" setting for all future router operations.
I intended to use my DeWalt 364 with the Saw Guide, but the base plate of the DeWalt is too large
to fit within the fixed frame of the Saw Guide. Reluctantly, I tried to mount the PC743 to the Saw Guide,
but it wasn't a good fit, plus the left-mounted blade, normally a boon, meant that I would have to use
the saw with my left-hand, kind of defeating the purpose of buying the saw in the first place. So, I mounted
my cheapie Skil 5170 in the frame. A perfect fit, and it works fine. The process:
Disassemble the Saw Guide frame and clamp its adjustable piece to the bottom of the saw shoe,
with the crease of the frame against the outside of the shoe. Drill two 1/4" holes through the Saw Guide
frame and shoe.
Remove the frame from the shoe. File any burrs left from the drilling operation.
Fasten the frame to the shoe using the provided 1/4-20 thumb screws and brass knurled nuts.
Assemble the frame pieces and adjust the distance of the saw blade from the Saw Guide fence to
measurement "A" (See Above).
After adjusting the fence and saw blade distance, make sure they are parallel.
The key to using the JointAbility to match edge joint two boards is to rout the mating edge (A) of
one board on one side of the Jointability and the mating edge (B) of the second board on the opposite side
of the fixture. Thus, if the JointAbility fence is not 100% straight, or the router and router bit
are not exactly 90°, it shouldn't matter, the matched edges will compliment each other perfectly.
It works as advertised. I have edge joined both long and short pieces and the fixture works. The
edge surface quality is not quite as good as I get with my jointer, but it is more than satisfactory.
Most importantly, all edges have been very straight.
I was also impressed with the results with plywood, even with the standard router bit. Mr. Gudeman
suggests a speciality bit for plywood, but even the standard bit produces more than satisfactory results.
It is built very well. The metal components of the fixture are powder-coated, meaning the stuff ain't
going to wear off through normal use. In fact, I barely scuffed the surface of the Saw Guide when I
was filing off the burrs I created when drilling.
Relatively portable, unlike my jointer. If you have to do onsite jointing, this fixture would
be a real asset.
The JointAbility and its Saw Guide work well for cutting panels with at least one caveat--you have
to support the cutoff and the clamped end. Since the Jointability base is 1-1/2" high, you can use a 2x4 clamped or tacked to your table
to support the workpiece.
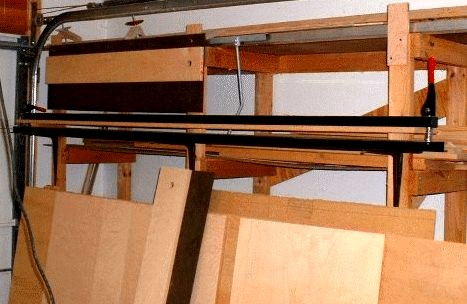
Where do you store it? I try to imagine ownership of a tool before buying it, including
where I am going to store it when not in use. I didn't think about this small detail for this purchase. Lately,
I have been using the jointability so much, I leave it out, but it takes up a lot of floor space.
I probably should have purchased the 60" model. Bigger is not always better, though this is a
lesson I am having a hard time learning. The 96" model requires lots of grunt to move around and to
store. It is awkwardly heavy. It weighs approximately 70 lbs, which is not TOO heavy, but with a length of
over 8 feet, it is unwieldly for one person to move around, lift onto a shelf for storage, etc.
A bit unwieldly and time-consuming as a panel saw. I had planned to use the JointAbility as a panel saw, using its Saw Guide to cut the panel 1/8" oversize, and then trimming it to final size using the JointAbility router bit. But this is more trouble than it is worth. I simply use my panel cutting table and circular saw guides--they produce excellent results and are far quicker than setting up large panels in the JointAbility.
I also use the JointAbility to give a finished edge to plywood workpieces I have cut with the
circular saw. However, the added steps don't fit my "less-is-better" mentality. In the past, I simply performed
Steps 1 and 5. With that said, I do get a much better edge following this somewhat time-consuming process.
The process is as follows:
Mark and cut the plywood to finished size, plus a bit.
Mount the panel in the JointAbility, fussing with the panel until it extends approximately
1/8" beyond the melamine table. If the panel is large, this is a real hassle.
Jerry-rig something to support the panel and cut-off.
Trim the panel with the router and JointAbility router bit.
Take the panel to the table saw and trim the panel to finished size, routed edge against the fence.
I planned to use the JointAbility to rout dados. The idea is that you mark the top of
of the dado location with a pencil, align the pencil marks with the JointAbility melamine base, and rout the dado with your
JointAbility router bit. The problem is, I trimmed the melamine base with the suggested and provided
3/4" router bit and typically I do not rout a full 3/4" wide dado. I could use a smaller bit, but then
I lose the zero reference provided by the melamine base. So, if works great for 3/4" side dados, but other widths are problematic.
The cam-action hold down clamps work, but their action is not very smooth. Update: This has been fixed by employing a nylon larger area spacer/washer. You can purchase the nylon washer from Jointability/RBI or pick them up at a hardware store, which is what I did. Works FANTASTIC!
The optional Saw Guide only supports one side of the saw shoe, thus the saw flexes within the frame while cutting. Since you follow the saw cut with a pass with the router, a "poor" saw cut is not the end of the world. When I get some time I will look for a way of supporting the shoe. Frankly, you're probably better off making your saw guide. I plan on doing this in the future when I get some time.
Limited thickness. I believe the maximum thickness the Jointability / Router Bit will handle is about 1-3/4". I am limited to 1-1/2" due to the router bit I purchased. RBI sells a 2-1/4" bit, but the actual cut depth is limited by the 3/4" thickness of the melamine base.
Limited minimum width. RBI claims that you can joint boards 2" wide or wider. Using the jig straight up (no additional holders), I can't joint a board less that about 4" - 5" wide with the Jointability.
Quick edge jointing. After using the JointAbility for awhile, I prefer it to my jointer for general jointing tasks. For instance, in no time at all I jointed one edge of 25 work pieces prior to ripping them on the table saw. The edges came out perfect with one pass.
Plywood edging. I use lots of plywood. In the past, when I attached the solid wood edging to plywood or MDF, any defects in the panel's edge (chipout, etc.) seem to be magnified. But if you run the plywood workpiece through the JointAbility, the plywood's edge will be near perfect and the plywood/solid wood transition appears to be seamless.
Face Frames. I run the front edge of plywood cabinet sides through the JointAbility to clean up the edge that mates
to the solid wood face frame for a perfect, seamless appearance. You may notice that large furniture manufacturers often use a chamfer cutter to "highlight" this seam since they have trouble getting "right".
Rout rabbets and dados. Routing rabbets on plywood backs is a piece of cake. Dados for 3/4" shelves is also cake.
Occasionally when running large panels through the table saw, I'll mess up a small section, usually
the leading or trailing edge. Now, I simply run the panel through the JointAbility and clean up any goofs.
Jointing long solid wood workpieces. I have a good Delta jointer, but I have difficulty with jointing
long workpieces. It is a no brainer with the JointAbility.
I used it to cut and trim various lengths of plywood as panel saw guides. They turned out perfect. I use these
guides almost daily and with mine finely tuned circular saw produce cuts as true as the table saw.
Rout / Joint one straight edge on rough sawn lumber that is not S2E.
Cut and rout round or irregular shaped objects. You can't beat the Jointability for routing dados and rabbets in round and irrregular shapes. It is also great for cutting corner shelves, or any odd shaped piece that is unwieldly on a table saw.
The JointAbility is a well-built and well-designed tool that works as advertised, for edge jointing and matched edge
jointing. The other uses for the JointAbility stated in the marketing collateral also work but require some additional effort and fiddling around--primarily supporting large workpieces. I can recommend the tool to any cabinetmaker who does not have a jointer or has difficulty jointing long workpieces. As expected, I use the tool a lot and would buy it again without a second thought. However, I would not buy it solely or primarily for its other advertised capabilities (panel saw, routing dados, and so forth). I am also not completely sold on the performance/value of the optional Saw Guide.
Note: Due to the price increase of the Jointability, I would have to look long and hard at it before purchasing it, especially if I already had a good jointer. The current price of the Jointability is almost double what I paid. It's still a good value if you can get it at a discount, but $400 is a lot to pay for this tool.
By the way, I have received a number of emails asking why my review of this tool tends to read a bit more negatively than other tool reviews on the web. All I can say, I paid for my Jointability. It was not a freebie. I paid for it, I own it, and I have used it the better part of ten years. Thus, I stand behind what I have written.
I also purchased a 96" model without much thought about storing it. The solution became a high priority since it was always in the way and just too heavy to be moving around. I have open floor joists in my basement shop and have utilized this space for hanging clamps, extra hose for the dust collector, and anything else that would fit. I cleared some space, hung a roller below the joists which allows me to lean it against it, push it forward and up, and secure it by mounting closet rod brackets in a couple of places, and slipping the closet rod in the holders to support it. I also use it for the tasks you mentioned and found it to be a quality tool, and would recommend it to anyone who desires quality joints.
My version of the Panel Cutting Table described in an article from Fine WoodWorking,
Issue #143, titled "A Circular Saw in the Furniture Shop?" Panel Cutting Table.
 Welcome to our review of the JointAbility Matched Edge Jointer. The JointAbility Matched Edge Jointer is used to
plane/joint edges using a router. Unless you have a well-tuned jointer, jointing long workpieces and plywood can
produce less than acceptable results. My projects often require jointing both long work pieces and plywood so I tried to devise an easy method to rout the edges. After several unsuccessful tries, and a dozen calls to Bill Gudeman (Jointability designer and original manufacturer), I bit the bullet and ordered the JointAbility Matched Edge Jointer.
Welcome to our review of the JointAbility Matched Edge Jointer. The JointAbility Matched Edge Jointer is used to
plane/joint edges using a router. Unless you have a well-tuned jointer, jointing long workpieces and plywood can
produce less than acceptable results. My projects often require jointing both long work pieces and plywood so I tried to devise an easy method to rout the edges. After several unsuccessful tries, and a dozen calls to Bill Gudeman (Jointability designer and original manufacturer), I bit the bullet and ordered the JointAbility Matched Edge Jointer.
 The key to using the JointAbility to match edge joint two boards is to rout the mating edge (A) of
one board on one side of the Jointability and the mating edge (B) of the second board on the opposite side
of the fixture. Thus, if the JointAbility fence is not 100% straight, or the router and router bit
are not exactly 90°, it shouldn't matter, the matched edges will compliment each other perfectly.
The key to using the JointAbility to match edge joint two boards is to rout the mating edge (A) of
one board on one side of the Jointability and the mating edge (B) of the second board on the opposite side
of the fixture. Thus, if the JointAbility fence is not 100% straight, or the router and router bit
are not exactly 90°, it shouldn't matter, the matched edges will compliment each other perfectly.