Festool Multifunction Table (MFT 1080)
By Jack A. Loganbill
http://thewoodshop.20m.com
Introduction
I am often asked what are the most used tools in the shop. My typical answer is our table saws, planer, and routers. Lately, the most used tool in the shop is the Festool Multifunction Table (MFT) 1080. It has become our workbench, clamping station, sanding table, sliding miter saw, router table, demonstration table, and general work table.
In this article we'll discuss the MFT 1080 features we like and don't like as well as how to setup the MFT 1080, its guide rail system, and the Festool ATF 55E Circular Saw to cut more accurately than a radial arm saw, sliding miter saw, and perhaps even a table saw.
Clicking the hypertext links (bold-faced blue text) and blue-framed images will launch additional content.
| Manufacturer: | Festool USA Tooltechnic Systems, LLC 140 S. Los Carneros Way Goleta, CA 93117 |
| Toll-Free Phone: | (888)337-8600 From Canada, call: (805)685-3757 |
| Fax: | (805)685-5927 |
| Web: | Festool USA |
| Email: | Festool Sales |
Special thanks to Christian Oltzscher (President and CEO of Festool USA) and Bob Marino (Festool Sales Rep) of Festool USA for providing the Festool Multifunction Table for our use and this review.
Description
|
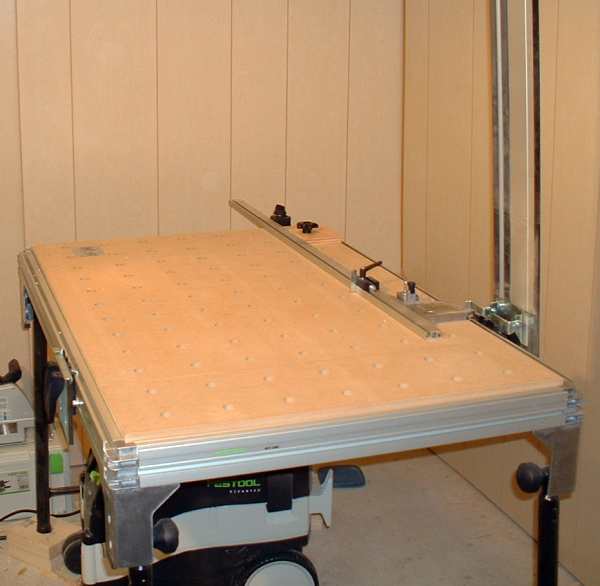
The Festool MFT 1080 is exactly what its name implies: a multifunction table. The table legs fold-up for storage and unfold to give the table a 32" working height. The reversible/replaceable work surface is approximately 24" deep and 48" wide. It is perforated with 3/4" holes spaced about 3-5/8" apart designed to accept the included protractor head and several styles of optional clamps and stops. The table works great as a workbench, assembly/clamping table, sanding table, and so forth. Using the optional Festool clamps, I have found it very easy to clamp work for hand-planing/shaping operations.
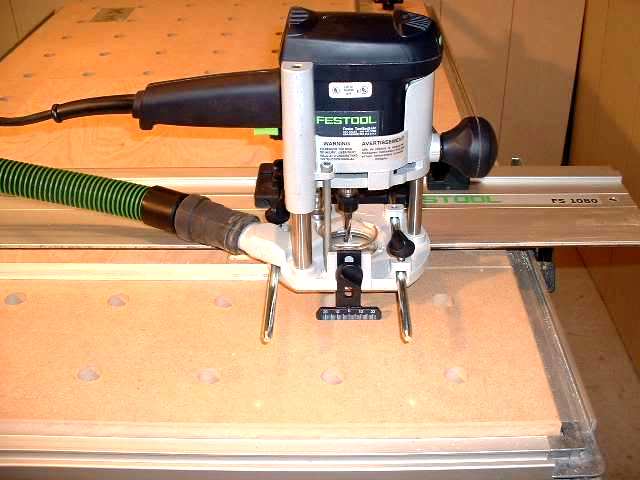
The MFT includes a protractor head, a 48" long aluminum crosscut fence and stop, an FS 1080 guide rail, and guide rail support brackets that convert the MFT into a sliding miter saw when used with a Festool ATF circular saw and an overhead router system when used with the Festool OF 1000 router. After only 10 minutes or so of calibration, I was able to achieve remarkable precision in regards to squareness and crosscut length. Few radial arm or sliding miter saws can boast the accuracy and width capacity of the MFT / ATF Circular Saw combination. Note: For those contemplating the MFT/ATF combination as a sliding miter saw, there is one caveat: I have not figured out a way to use it to miter large crown-type moldings vertically. Of course, you can lay the material flat on the table and setup the guide rail and ATF to cut a compound angle, but due to the precise requirements of the angles, I have not tried it. However, as a panel crosscutting device, the MFT/ATF combination is hard to beat.You can attach the fence to the protractor head using either of two height positions. The lower position provides a 1/2" support height; the higher position provides 1-3/8" of height. I've been using it at the 1/2" height. The MFT guide rail support brackets slide up and down allowing you to set the guide rail anywhere between approximately 1/2" to 3" above the table. The rear support bracket mount for the guide rail is hinged. Consequently, when not in use, you can lift the guide rail up and out of the way. | ||||||

|

|
|
Installation and Setup
Aside from carting its huge shipping box off the shipping dock, setting up the MFT 1080 was a breeze. The parts included in the shipping container include:
- The table frame, table top, and leg assembly.
- Circular Saw/Router Guide Rail.
- Front and rear guide rail support brackets.
- Protractor head, fence, stop, and fence lock.
I installed/setup the MFT using the following steps:
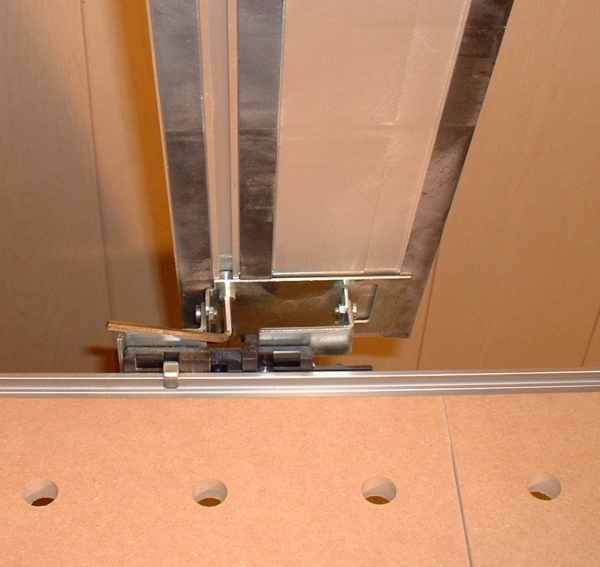
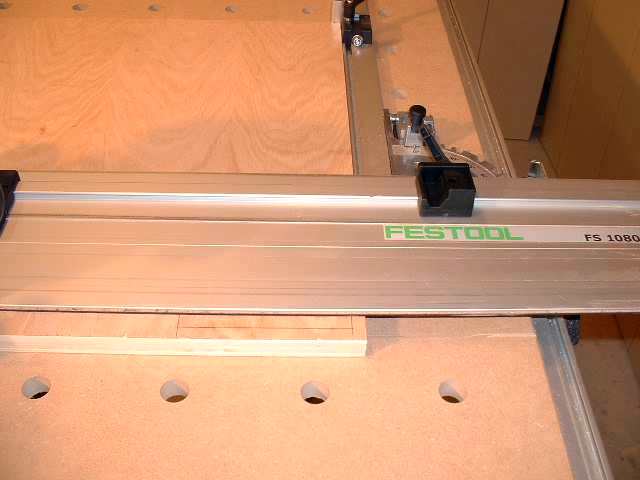
Step 2: Install the guide rail front support bracket. The front bracket is distinguished by its small sheet metal tab that fits the channel along the underside of the guide rail. Notice that the factory installed a stop in the front table frame to accurately position the front support bracket. DO NOT ADJUST THIS STOP. Attach and slide the front support bracket, from the left end of the front table frame rail until it hits the pre-installed stop and tighten its lock knob.
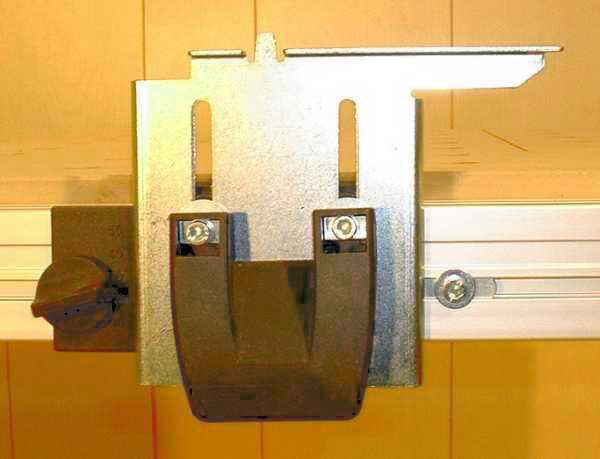
Step 3: Install the guide rail rear support bracket. The rear support bracket is distinguished by its rotating guide rail platform and guide rail connector bar. Again, notice that the factory installed a stop in the rear table frame to accurately position the rear support bracket. DO NOT ADJUST THIS STOP. Attach and slide the rear bracket from the right-end of the rear table frame rail until it hits the pre-installed stop and tighten its lock knob.
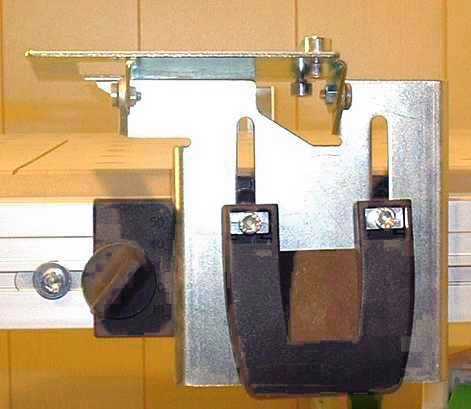
Step 4: Install the guide rail. Slide the guide rail onto the guide rail support platform of the rear support bracket and tighten the support bracket's guide rail connector using the supplied Allen wrench. Rotate the guide rail down towards the front support bracket and make sure that the bottom channel mates with the guide rail tab on the front support bracket.
You adjust the height of each support bracket by releasing its clamp, sliding the bracket up/down, and locking it into position with the clamp. You may have to tighten/adjust the front/rear guide rail support bracket clamps using the two Allen screws to ensure they clamp satisfactorly. The first time I used the guide rail, the weight of the saw and my pressure caused the support brackets to slide down a bit, causing the saw to cut deeper into the table top than I had planned.
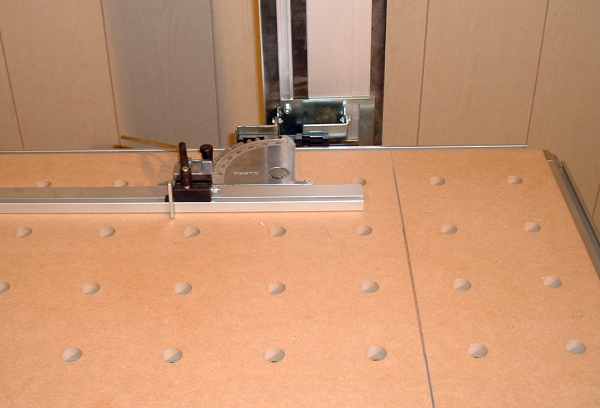
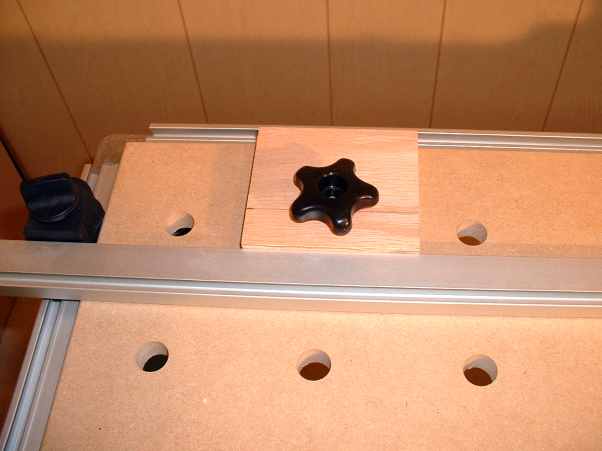
Step 5: Install the protractor head/miter gauge & attach the fence. Place the protractor head/miter gauge in the rear holes, specifically rows 4 & 5 from the right-hand edge of the table. Notice the bottom of the miter gauge has two studs that fit through the table holes and large screw knobs to lock the miter gauge in place.
Attach the fence. You can attach the fence to the miter gauge using either of two slots that run the length of the fence. One slot sets the fence at a height of 1/2", the other sets the height at 1-3/8". I have been using the fence at the 1/2" height so that the guide rail sits flat on the 1/2" to 3/4" thick materials I tend to use most.
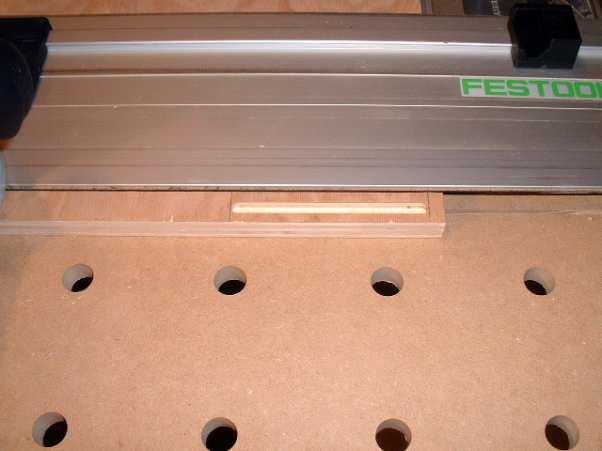
Step 6: Calibrate the protractor head/miter gauge. During the photo shoot, we decided to completely disassemble the MFT and reassemble and calibrate the protractor head/fence. Using the five step calibration method I was able to square the fence to cut a 16 x 16 workpiece within .002" square, for 16". I doubt any sliding miter or radial arm saw offers this level of accuracy: .0015" (1-1/2 thousandths) per foot or .000125" (1-1/4 ten thousandths per inch)! I acheived this accuracy after only one adjustment of the fence (I first squared the fence / guide rail with my Starrett combination square to .008" per 16", which of course is more than acceptable in its own right. I left the small blocked bolted through the table to act as stop so that I can always return to this near perfect setting. Click here to view calibration sequence.
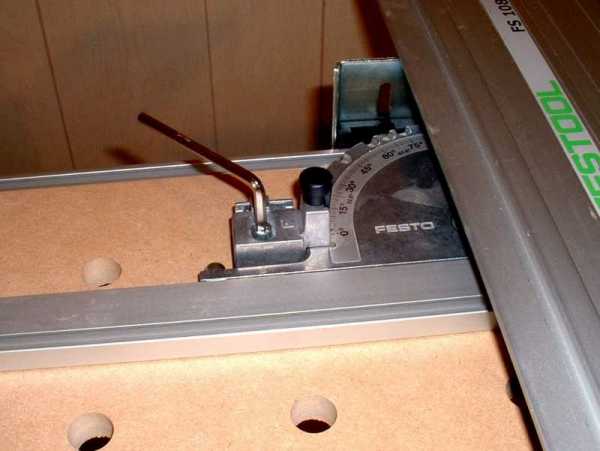
Step 7: The table and guide are now ready for use. The fence is 4 feet long and thus must be locked down at its far left end. A sliding black plastic lock is provided to lock the fence in any position along its arc. The lock simply slides in a channel of the left or front table rails. Without this lock, the fence is easily bumped out of alignment. I left my adjustment block as it serves as a sure 0° stop for the fence/miter gauge.
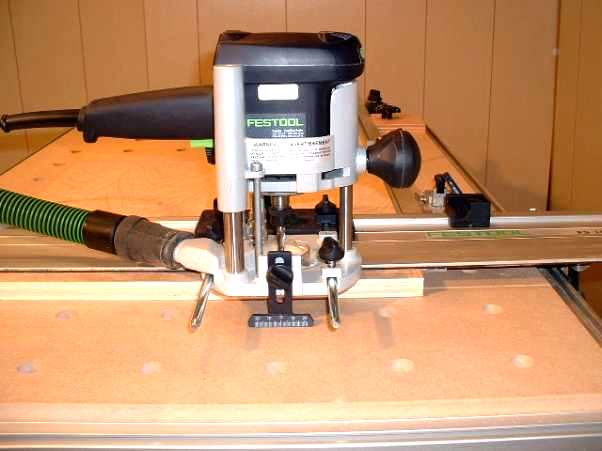
Before you make a cut with the ATF circular saw, adjust its depth of cut so that it just barely cuts into the top. Again, make sure that you adjust the tighteness of the front/rear guide rail supports so that when you clamp them down, they don't slide down with you apply the weight of the saw.
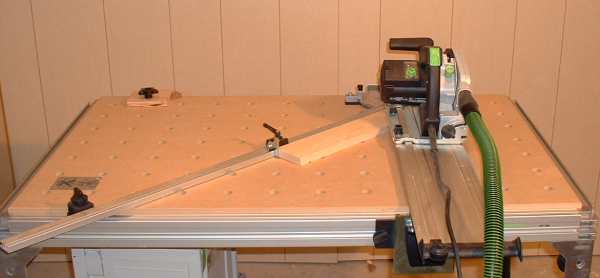
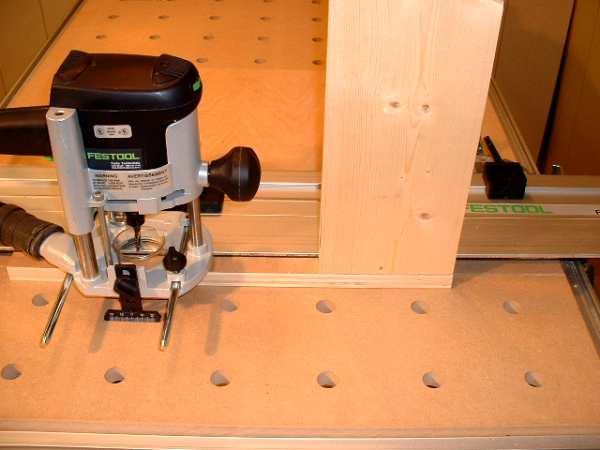
I finished setting up the table and guide rails by cutting a few panels and 45° cuts for a small frame as shown in the photo to the left. Once setup the saw and guide rail cuts perfectly square and miter joints. The extra block I added provides me a bit more security knowing I can remove the miter gauge head and fence and replace them without having to recalibrate.

What I Like About the Festool Multiple Function Table
Extremely Versatile
The MFT is a versatile work bench/work station. The perforated flat top and the open design simplifies clamping work and jigs for hand and machine operations. It seems like there is always a way to fit a clamp on, around, or through the top to hold down work.
Light But Stable
It is light enough to be portable, yet it feels as solid as a fixed bench. I don't do much work out of the shop, but you could take the MFT just about anywhere and instantly setup a work station for cutting, routing, sanding, and assembly.
Integrated Saw / Router Guide.
The integrated guide rail, miter gauge/fence, and Festool ATF circular saw provide a very accurate crosscutting system. It is especially useful for crosscutting wide panels (up to 24"). I found cutting precise angles on large (wide) work is a piece of cake with the MFT.
When used with the Festool OF1000 router and its guide rail attachment, you can accurately and easily rout dados, rabbets, and sliding/housed dovetails in small or large panels. It is perfect for dadoing & rabbeting cabinet sides for shelves, tops, and bottoms. The combination of the fence stop and the guide rail's non-slip strip does a good job of holding the work in place while cutting and routing. For our shop, the combination of the MFT with our shop-made panel cutting table has ended any desire I had for a vertical panel saw/router setup.
|
|
|
|

|
|
What I Don't Like About the Festool MFT 1080
Protractor Head / Shot-Pin Is Easily Budged
The protractor head locks in place using a spring-loaded shot-pin. Even with the shot-pin fully engaged, the protractor head can be budged several degrees if the fence is bumped, or can be knocked completely off of the setting if you deliberately bump the fence. For this reason, a fence lock is provided and must be used. However, I found the head can move several degrees while fastening the fence lock. Consequently, I made a small stop for the rear edge of the fence. When I want to return to zero, I simply set the fence up against the block and tighten down the fence lock. Click here for Darryn's comments regarding his protractor head / shot-pin fix.
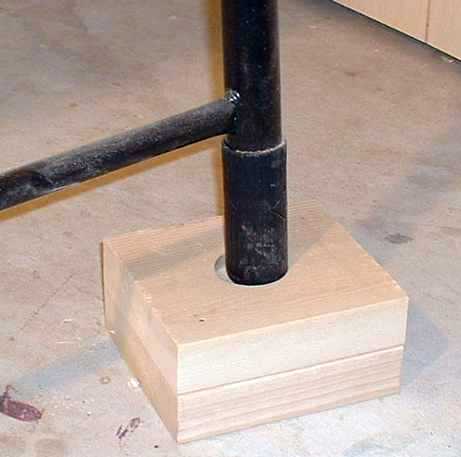
Table is Too Low.
I'm 6'2" and the table top height is about 32". I don't mind bending over to kiss the wife, but the MFT is too low for my comfort. I made up four blocks with counter bored recesses that raise the table to a more comfortable height. Festool responded to this gripe indicating that the table height was designed with both short & tall woodworkers in mind. Obviously no size fits all when it comes to workbenches. Height adjustment (as well as wheels) were considered, but the added weight was unacceptable for a tool designed to be portable.
Hard To Hold Short Work When Crosscutting
The table, guide rail, and fence system handle large work very well but short work pieces can be hard to hold. Due to the width of the guide rail, it is difficult if not impossible to manually hold down work pieces with a length less than 6" when cutting at 0° and work pieces less than 9" to 10" when cutting at 45°. The instructions and my experience suggest that you drop the guide rail down on top of the work. Doing so however, makes it difficult to fit a hand under the rail to hold work. The Festool flat clamps will hold the material, but you they only fit under the guide rail when cutting material thicker than 3/4". Click here for Wayne Tinker's comments regarding crosscutting short work pieces, and the MFT in general.
Setup and Tear Down
With this gripe you know I'm scratching for something negative to say. Let me pull one up from my years of experience with Shopsmiths. But first, look up the word Multifunction, Multifunctional, or the words Multiple Function in the dictionary. The second definition down reads like this:
A trait, often associated with woodworking tools, that requires repetitious acts of setting up and tearing down.Okay, I took a bit of literary license there....The MFT is so right for so many functions (like that favorite Swiss Army knife in your right hand pocket), that you want to use it for everything, meaning the setup for function A gets in the way of Function B. For instance, several weeks ago I clamped the AKEDA dovetail jig to the MFT. The jig sat on the table at just the right height, and provided ample space for routers, cutters, and guide fingers. Then I needed to crosscut a stack of work pieces to length. Choice: Remove the AKEDA-related stuff off of the table or do the crosscutting somewhere else.....
The Bottom Line
The combination of the MFT, the ATF 55E Circular Saw, the OF1000 Router, the ES150 sander, and the CT22E dust extractor gives new meaning to the concept of a five-in-one or multiple function tool. After working with the MFT for about a month I wrote Bob Marino and suggested that Festool should offer such a combination as a small shop cabinetmaker's / finish carpenter's package. I spend more time at the MFT than any other tool in our shop. It's a work bench, assembly table, crosscut panel saw, chop box, sanding station, overhead router table, and more. Since it comes with the guide rail assembly, I definitely recommend it to anyone who has a Festool ATF circular saw. And it should certainly at least be considered by anyone planning on a panel saw purchase. Now if only the top would magically clear itself for the next operation....
| Rating: |  
| out of 5! |
Comments From Festool
Bob Marino, a Festool Sales Representative, responds to this article...
The (MFT) table top can be turned over and turned side to side providing a long life before it is no longer useable.... (it) should last a long time. Also the entire fence/miter gauge assembly can be moved to the other side of the table if you wish.
Comments From Readers
I have received a number of "lengthy" comments from readers regarding the MFT and/or its accessories. Click here to read them.
A Year Later
I continue to receive emails questioning the usefulness of the Festool MFT and whether or not I use it. I use the MFT everyday, and in ways I would have never imagined prior to owning one. I have since discarded my main workbench. In a recent email exchange with Russ Ginter, I wrote the following (edited slightly) that sums up pretty well my thoughts and use of the MFT (and other Festool tools)....
Russ,
First of all, I believe the table saw to be the single most important tool in the Woodworking shop. No tool, when setup correctly, provides the combination of cutting versatility, speed, and accuracy. Some tools may be faster, but not as accurate. Others are more accurate, but not have the versatility of the table saw. Consequently, my recommendation is to always begin with the best table saw one can afford.
With that said, as you begin building cabinets or large case work, you most certainly will begin working with large sheets of plywood, melamine, and other similar panels. As you do finish carpentry, you will work with long work pieces, sheets of paneling, and so forth. These large or long items are typically difficult to work with on a table saw without expensive sliding tables, panel handling carts, and/or a helper.
This is where the Festool system shines. Using the MFT for crosscuts and a panel cutting table as I describe on the web site, and the Festool ATF circular saw and guides, you can easily handle, cut, and assemble cabinets and case work. Last week I was working with large and heavy melamine panels. With my panel cutting table, I can easily "load" the panels for cutting. With the Festool ATF, guide rails, and dust extractor, I can easily and accurately rip and crosscut the panels to size. 85-90% of the dust was collected. My back was saved. I did not have to wrestle the work onto a vertical saw, or the table saw. The cuts were chip-free.
Another project last week included a fairly large (10" x 10" x 40") dovetailed case. In the past I had some difficulty clamping a large carcase. Using the MFT with its perforated top, I was able to place clamps at every imaginable position around the "box" ensuring the dovetailed joints received adequate clamping pressure. Though Festool provides and offers additional clamps that work very well with the MFT, I have slightly altered (ground off the retaining pins) of an armload of Jorgensen F-style 12" and 24" clamps to fit through the MFT perforated top. Consequently, clamping odd-shaped or large carcases has never been easier. I just remodeled our shop and tossed my workbench. I now use the MFT and my TS outfeed table as my only work benches.
I used the Festool router, MFT, and the MFT guide rail to quickly rout large mortises in 8/4 lumber the week before. These were very large mortises--in the past I would have produced a makeshift jig. However, with the Festool router/MFT/Guide rail, I simply raised the guide rail to accomodate the thickness of the wood, placed the largest mortising/straight bit I owned in the Festool OF1000 router, and made 6-7 passes, sliding the router over the workpiece, guided by the guide rail. Could not have been easier or quicker. The mortises were perfectly square, depthed perfectly, the dust and chips were collected, the final job was done quickly and effortlessly. No wasted time building a jig I probably would never use again. No muss, no fuss.
Suffice it to say, users of the Festool system (MFT, guide rails, saw, router, dust extraction) find unlimited uses for the tools. I received several emails every week from users of the tools that extol similar experiences and virtues of Festool tools. Sure, there are other ways of acheiving all of the above. But the Festool system is compact, does not require shop-built jigs, provides excellent dust collection, etc., etc., etc.
Comments / Questions
Was this article helpful? Do you have any questions? E-Mail Us! We would love to hear from you!