Setting Up a Table Saw & Squaring Crosscut Devices
By Jack Loganbill TheWoodShop.20m.com
Introduction
This article began as simple guide to square miter gauges, crosscut sleds, or sliding tables to a table saw blade. However, it has grown to include the procedures for setting up and calibrating table saws--which you should probably do before squaring your crosscut device.
Tools I Use To Setup Table Saws
For years I maintained and calibrated my table saws using a combination of machinist's squares, combination squares, drafting triangles, feeler gauges, and block of wood attached to a miter gauge with a brass screw as a contact. A few years ago I made my own calibration tool, modeled after the TS Aligner Jr. That tool actually worked pretty well. Finally I broke down and purchased the TS Aligner Jr and the Jesada Set & Sand. I'm not sure this progession of calibration tools has improved the precision of our stationary tools, but it does make calibrating the tools easier and faster.
If you don't want to invest in these tools, I discuss conventional methods for setting up a table saw without spending big bucks later in this article. With that said, here is a list of tools I use to calibrate table saws:
TS Aligner Jr. I purchased mine direct from Edward J. Bennett's web site for less than $140. The summer sale price included a precision 90° / 45° square machined from hot-rolled steel. The TS Aligner Jr. significantly facilitates and speeds up the calibration of stationary tools--I highly recommend it.
Hartville Tools has recently introduced their TS Aligner Jr clone, which looks like it will do a fine job.
In-Line Industries manufactures and sells the A-Line-It tool, which is similar to the TS Aligner Jr in function, and appears to work very well.
Cheap Alternative: Block of wood and brass screw.
Jesada Set & Sand. You need a reliable surface for squaring the blade. A quality table saw blade is generally flat enough to work, but I recommend using a ground plate (Master Plate) or a dedicated ground sanding disk like the Jesada Set & Sand (Jesada #SBS-010, < $30) or the CMT Balance and Sand. My Set & Sand is not perfectly flat, but I get around that as discussed below. I used the word "dedicated" to underscore that I do not use the sanding disk for sanding. Cheap Alternative: A high-quality blade or believe it or not, a block of 3/4" melamine.
Starrett # C11H-12-4R Combination Square. This is the most used square in our shop. I use it for setup and calibration. It is the best and most reliable combination square I've used and you can purchase one for less than $70.Cheap Alternative: Machinist's Square.
Alvin 12" acrylic drafting triangle. I purchased a set of four Alvin triangles through a blueprint shop for less than $15. I have used a number of brands, and the Alvin 12" triangle is the most accurate drafting square of the bunch. Cheap Alternative: This is it!
Feeler Gauges. Cheap Alternative: Notebook paper is about .004" thick.
A standard dial indicator and magnetic base to check runout. You can purchase a setup from Grizzly for less than $20. Cheap Alternative: None, that I can think of for checking the arbor directly, but you can check blade runout using the wood/brass screw/feeler gauge combination.
Digital caliper, dial caliper, vernier caliper, or micrometer. Cheap Alternative: A good 6" machinist's scale-ruler will work, but not if you want absolute precision.
Felt Pen Marker or Grease Pencil. Cheap Alternative: A crayon? Don't use a graphite pencil. Why? Email me...
Setup and Align the Table Saw
This is the process I follow to setup and align the table saw and miter gauge for square cuts:
Clean all the dust from the table top and the table saw inside and out.
Check that the face of the blade is square with the table using a drafting triange or a combination square. Adjust as necessary.
Check the blade and arbor runout. You can use a typical dial indicator and magnetic base or the TS Aligner Jr. I check the blade and arbor using the TS Aligner Jr and check the face of the arbor flange with a dial indicator mounted to a magnetic base. If your arbor runout is more than .003", I recommend that you solve this problem before continuing. In my case, the arbor runout on our PM 66 is about .001", my flange runout is negligible, but the combined arbor & blade runout (Forrest WWII) is .003" to .004". I live with that. Possible causes of runout include: arbor bearings are shot, dust/resin residue/burrs on the arbor flange are not allowing the blade to seat correctly, the blade is warped (not flat), and a bent arbor (unlikely).
Ensure that the blade is parallel with the miter slots. If the blade is not parallel with the miter slots, you'll have a hard time getting square and consistent crosscuts. As well-built as our PM 66 table saw is, I do check this often (once a month or so), and I frequently find that it is off. I set the blade so that it is parallel with the right miter slot to a tolerance of +.000" and -.001", meaning either the blade is right on, or it angles away from the right miter slot by no more than .001". Click the Image Below or this link to view the step-by-step procedure:
Since the Set & Sand and arbor together have about .003" runout, I placed a mark on the Jesada Set & Sand and use that as a reference point.
I set the TS Aligner Jr in the right miter slot and adjust it so that the dial indicator point contacts the Set & Sand leading edge at the reference mark. Adjust the dial indicator so that it reads somewhere close to its mid range (.300" to .500") and set its bezel to read 0.
Rotate the Set & Sand rearward so that the reference point is now at the rear. Slide the TS Aligner Jr to read at the reference mark.
Adjust the table / trunnions / whatever so that dial indicator reads within your acceptable range. Since I do all of my crosscutting and ripping from the right, I make sure the blade is either exactly parallel with the miter slot, or it heels away from the miter slot / fence by one or two thousandths of an inch. This is simply my personal preference and should not be regarded as fact.
Recheck that the face of the blade is square with the table using the drafting triange or combination square. Adjust as necessary and set the 0° stop.
Now your ready to square your crosscut device....
Squaring a Crosscut Device
Unfortunately, squaring a crosscut device to the blade using a carpenter's square or a machinist's square does not always cut it. Using a precision drafting square and the Jesada Set & Sand, I can actually get very close to perfect, but there is typically some room for improvement. Consequently, I use the following methods (primarily the one-cut and five-cut methods) to test my crosscut devices and determine how much of adjustment is required.
I begin by squaring the crosscut device (miter gauge, sled fence, or sliding table fence) to the Jesada Set & Sand disk using a drafting square or the Starrett Combination square. This usually gets me to within a couple of thousandths of an inch across a work piece of 20 inches or so.
Once I'm satisfied with the initial adjustment, I perform one of the following test methods:
One-Cut Method. This is the quickest method, and is usually quite satisfactory. After cutting a workpiece in two, you flip one half and butt the workpieces together. The width of the gap, if present, is two times greater than the fence is out of square. The key to this method is to make sure the long edges are parallel. I joint one edge and then rip the other edge to ensure the two edges are parallel. Click Here For A Flash Demonstration of the One-Cut Method
Three-Cut Method. This is the method recommended in the In-Line Industries Dubby Users guide. It requires that you cut three sides of a work piece (approx. 20" x 20") and measure diagonaly across the board (opposite corners). Click Here For A Flash Demonstration of the Three-Cut Method
Five-Cut Method. This method requires that you cut four sides of a large work piece, and then cut off a piece from the first side cut and measure the cutoff at both ends. The difference of the two measurments is four-times the actual amount the fence is out of square. Click Here For A Flash Demonstration of the Five Step Method.
I wager that most commercial shops do not use dial indicators and expensive aligner tools to calibrate their tools. The basic tools you need include:
A good straight edge. Starrett probably makes the best straight edges, but I purchased an inexpensive alumimum straight edge from Lee Valley and have been quite satisfied with it.
Feeler gauges. Lee Valley has "special" feeler gauges that are extra long, especially designed for woodworkers.
Quality drafting triangle, Machinist's / Engineer's squares, and/or a quality combination square, such as the Starrett described above.
A block of wood (3/4 x 2 x 8) with a brass screw screwed into one end.
To check table flatness: lay the straight edge, on edge, across the table (left to right, front to back, corner to corner), measuring any gaps with the feeler gauge.
Check that the faces of the blade and fence are square to the table using your square.
Check that the blade is parallel to the miter slot:
Insert your miter gauge in the miter slot.
Clamp the wood block with brass screw onto the face of miter gauge, and slide/extend the block so that the screw touches a tooth on the leading edge of the blade.
Mark the tooth with a grease pencil.
Rotate the blade clockwise so that the marked tooth is at the rear and slide the miter gauge to the rear.
Measure the gap between the screw and the tooth.
If there is no gap and the screw/tooth touch with the same force as in the first position, your good to go. Otherwise, adjust the table accordingly.
Check that the miter slot and fence face are parallel. (Repeat the previous steps, but with the fence, not the blade.)
Rip the workpiece to 6" wide with the jointed edge against the fence. Crosscut the work piece to 12" - 24".
Scribble a line across the face of the workpiece.
Crosscut the workpiece more or less in half using the miter gauge. (Use a stop to ensure the work piece does not shift during the cut.)
Butt the two pieces together against a reliable edge so that your scribble line connects. There should be no gap between the edges of the freshly cut work pieces.
Flip the left-hand piece so that its bottom is now the top and your scribble line is facing away.
Butt the two boards against a reliable edge. If there is no gap, your good to go. If a gap appears, adjust the miter gauge accordingly and repeat. If the gap appears at the top, your miter gauge is less than 90°. If the gap appears at the bottom, your miter gauge is greater than 90°.
You wrote a good article; however, I'd suggest that you also address contractor saw blade alignment to the table/mitre gauge tracks. I suspect that more home wwkrs. use contractor saws than cabinet saws. All subsequent adjustments are pretty easy compared to getting that one done.
I've read several books, mag articles and web articles on this topic but am yet to find one that adequately addresses it. I realize that mfr. differences might complicate the topic, maybe even make it impossible.
If I were knowledgable enough, I'd write one myself; but I still can't keep mine aligned.
Thanks for posting about your article.
BobH
Jack Loganbill responds...
Bob,
You bring up a good point, but you may have noticed that I stopped short of explaining the specifics of adjusting the blade / miter slot parallelism (sp) for any particular type of saw.
On my two cabinet saws this is done by loosening 2 of 3 bolts (PM 66) or three of four bolts (Grizzly 1023S) and then moving the table in one direction or another (usually by hammering the table front/back with a dead-blow mallet).
On my old Sears contractor's saw this was accomplished by loosening the trunnion/carriage mounts and lightly hammering on the trunnions in the appropriate direction using a hammer and wooden stick. I had a very difficult time getting the contractor's saw aligned properly. Cabinet saws, in comparision, are a piece of cake.
However, checking for alignment using the one-cut, three-cut, or five-cut methods of course is the same for any type of table saw.
Thanks for your input,
Jack Loganbill
Charles Self responds in regards to setting up contractor's saws...
A PALS set up for your contractor's saw simplifies things considerably. You swap out the trunnion adjustment bolts with the PALS and then use a hex (Allen) wrench to adjust things. Much easier, about $22 plus shipping. My employer, Woodcraft, carries them.
Jack adds the following "brochure" description for PALS:
The PALS (Precision Alignment System) replaces the manufacturer supplied trunion bolts in your saw allowing you to micro adjust your blade’s alignment. Put away your old hammer and 2x4 adjustment tools and use the supplied Allen wrench for absolutely accurate adjustments. Complete with installation instructions. For more information, check with Woodcraft or In-Line Industries.
Fred Berry is another advocate of the Inline Industries' PALS system for setting up contractor's saws:
Jack,
This note is in reference to the correspondence relating to the use of the In-Line Industries PALS system. I aligned my Delta contractor’s saw in accordance with all the printed instructions and had it within –0.001” using the right slot. To make turning the blade easier, I took the load off the motor. BIG MISTAKE! When I made a test cut, the blade was way off, and when I rechecked the alignment it was off –0.012”. The motor needs to be in its normal position when aligning the blade. I assume that this applies whether or not the PALS system is used, however, I enthusiastically recommend the PALS. No more loosening/pounding/tightening endless task repetition to get within maybe 0.005” before finally saying “good enough.”
I am just a user – I don’t work for Woodcraft or In-Line Industries.
 For years I maintained and calibrated my table saws using a combination of machinist's squares, combination squares, drafting triangles, feeler gauges, and block of wood attached to a miter gauge with a brass screw as a contact. A few years ago I made my own calibration tool, modeled after the TS Aligner Jr. That tool actually worked pretty well. Finally I broke down and purchased the TS Aligner Jr and the Jesada Set & Sand. I'm not sure this progession of calibration tools has improved the precision of our stationary tools, but it does make calibrating the tools easier and faster.
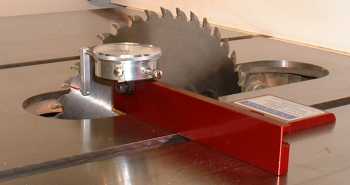 Since the Set & Sand and arbor together have about .003" runout, I placed a mark on the Jesada Set & Sand and use that as a reference point.
A PALS set up for your contractor's saw simplifies things considerably. You swap out the trunnion adjustment bolts with the PALS and then use a hex (Allen) wrench to adjust things. Much easier, about $22 plus shipping. My employer, Woodcraft, carries them.